Complete Structural Rehabilitation & Addition — Utah
From structural disaster
to rebuilt home.
A failing foundation. Sagging floors. Compromised load paths everywhere. Most contractors walked away. Three Peak walked in, shored it up, dug it out, poured new concrete, installed steel, framed a second story, ran all new systems, insulated it, and put a roof on it.
The Transformation
Drag to Compare
From crumbling foundation to rebuilt home. Slide to see the transformation at each stage of this structural rehabilitation.
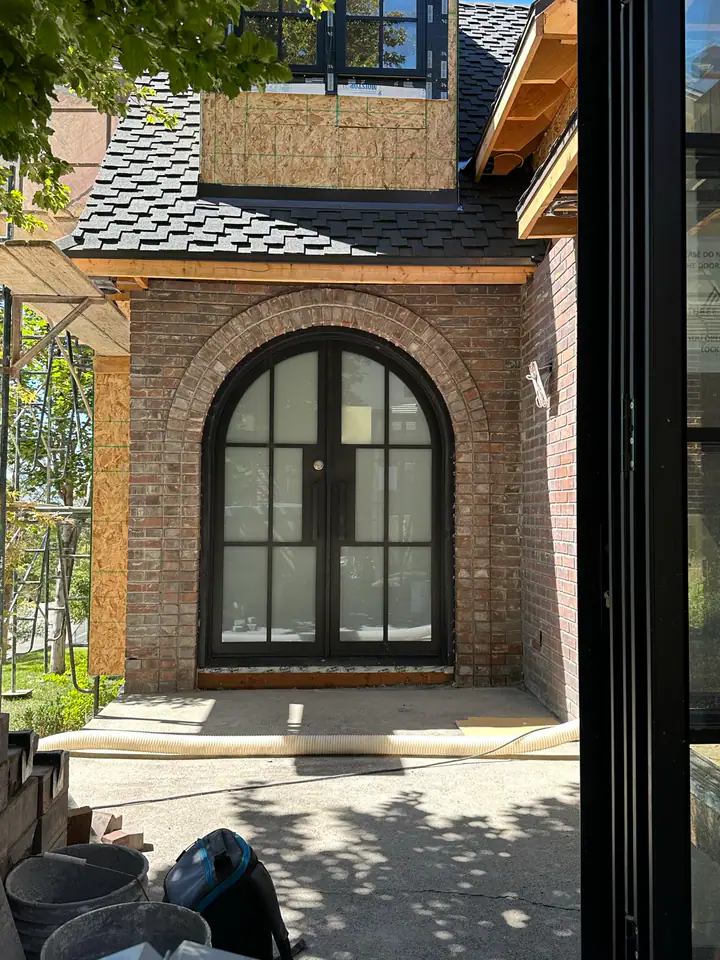
Exterior transformation: from a structurally compromised crawlspace to a fully rebuilt two-story home with new foundation, steel framing, and architectural finishes
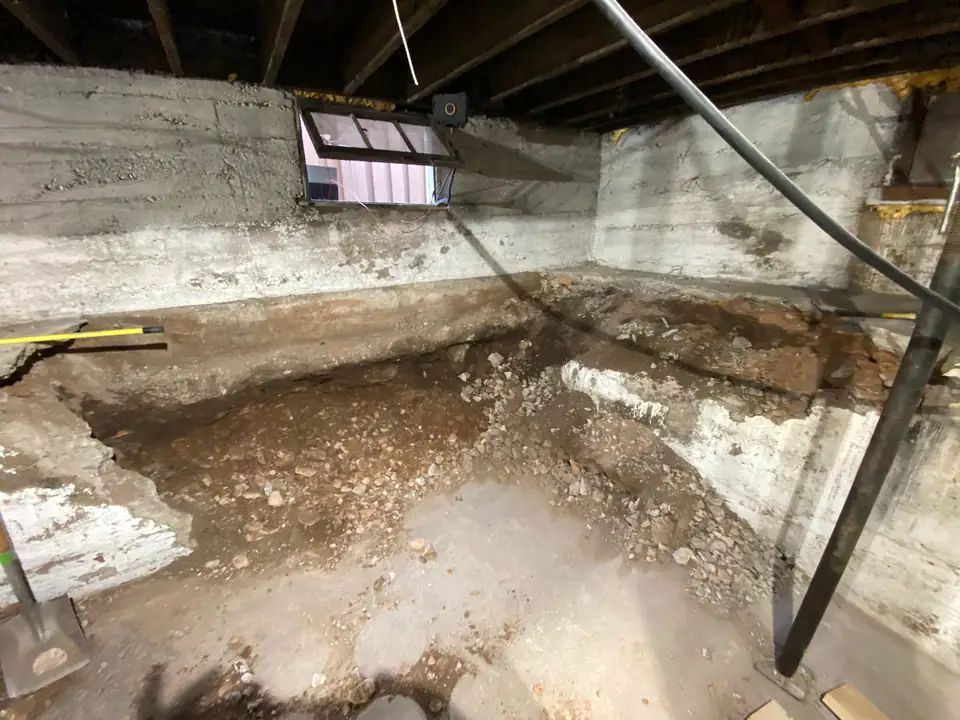
Foundation transformation: from undermined footings with exposed soil to a new engineered floor system on steel beams
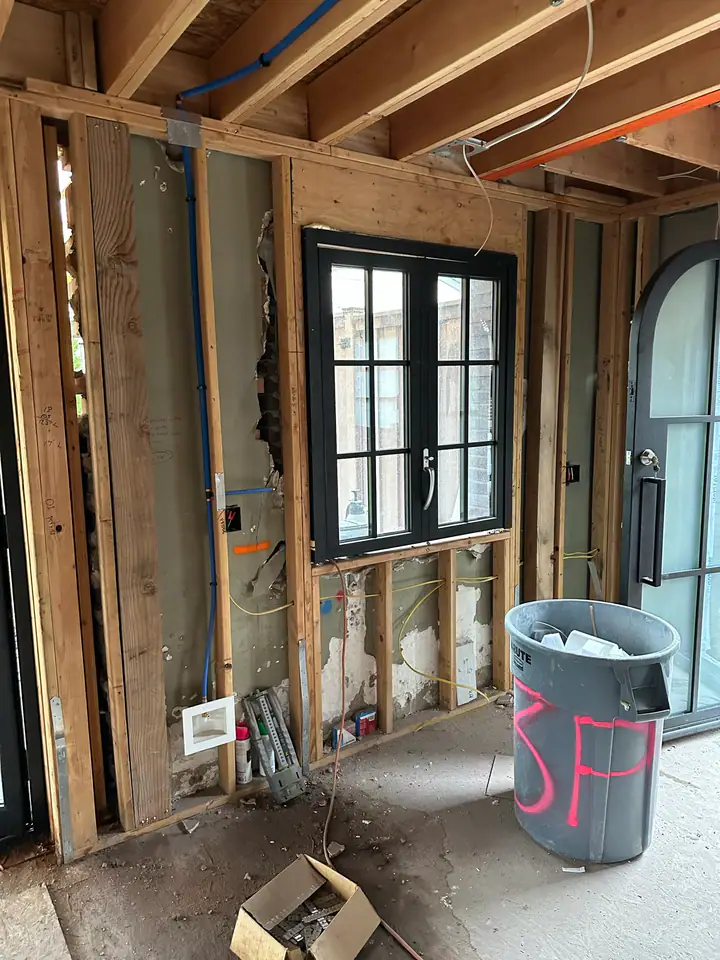
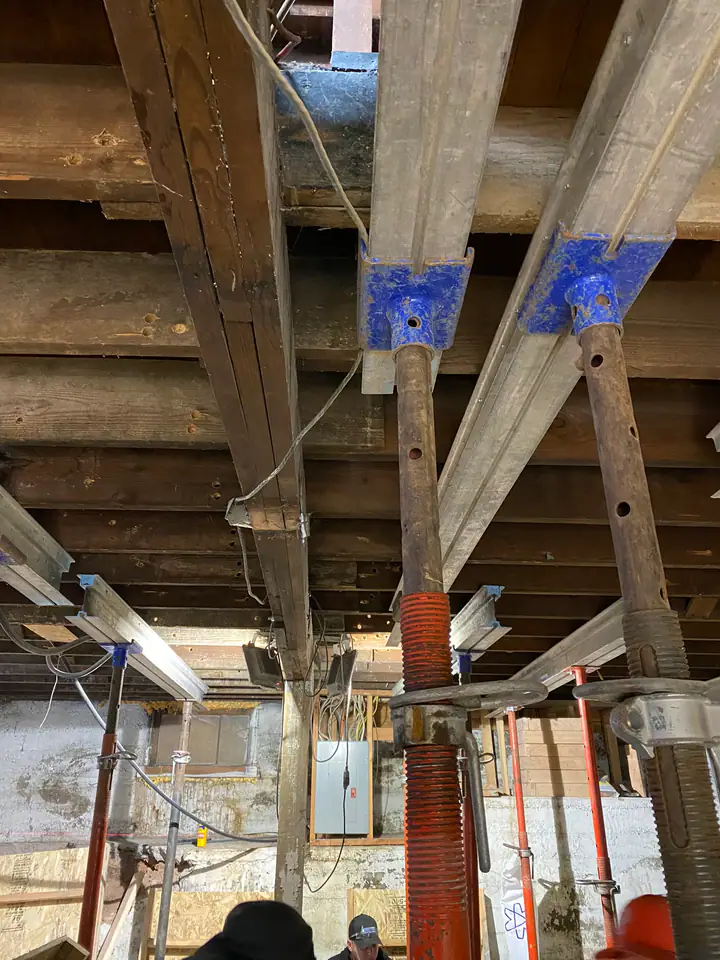
Interior transformation: from temporary steel shoring holding up the structure to new framing with custom black-frame windows
12 Chapters · 50+ Photos · 9 Videos
Scroll down to read the full story
The Discovery
What’s hiding beneath the surface.
An older brick home in Utah. From the street, it looked like a straightforward renovation candidate — dated finishes, tired layout, solid-looking brick exterior. But “good bones” is a phrase that gets thrown around too loosely. The bones need to actually be good.
Once the drywall came down and the floors came up, the real story emerged: undersized footings that predated modern code. A crawlspace with barely enough clearance to move through. Moisture paths that had been quietly working against the concrete for decades. Support posts sitting on pads that were never designed for the loads above them. Floor joists sagging visibly from years of inadequate support.
Most contractors see dirt and concrete. We see load paths, bearing points, and a sequence that has to be executed in exactly the right order.
This wasn’t a cosmetic renovation anymore. This was structural surgery — and the patient was still standing. The homeowners had a vision for a second-story addition, but you can’t add load to a structure that’s already failing. First, you fix what’s broken. Then you build what’s next.
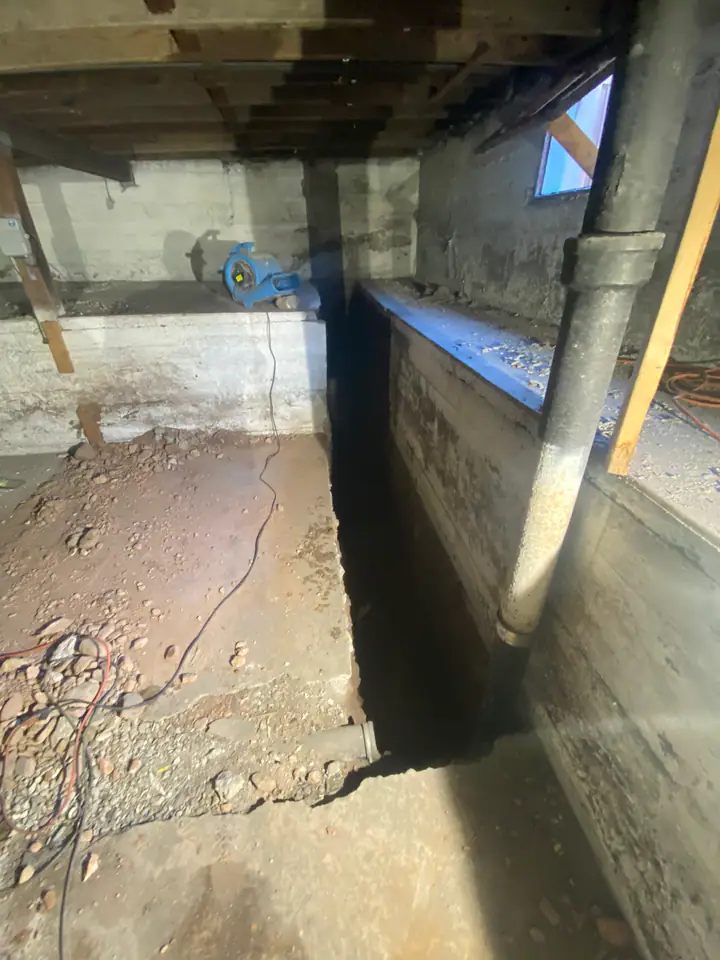
The original crawlspace: low clearance, aging concrete, exposed earth, decades of deferred maintenance
Preconstruction & Sequencing
You don’t dig until you’ve thought it through.
Before a single shovel hit dirt, Nate spent hours on-site with the structural plans — not just reading them, but pressure-testing them against field reality. Where do the loads actually transfer? What sequence do you excavate in so you never compromise the structure above? What happens if you hit water at depth?
The structural engineer provided the “what.” Nate’s job was to figure out the “how” and the “in what order.” That’s the gap between a plan on paper and a plan that actually works in the field — and it’s where most structural projects go sideways.
The engineering tells you what to build. Experience tells you what order to build it in — and what to watch for when the dirt doesn’t match the drawings.
The scope was massive: shore the entire structure with temporary steel. Excavate beneath the existing footings in controlled sections. Pour new, deeper footings. Install steel beams to replace undersized wood. Pour a new concrete slab. Frame a full second-story addition and new roof. Run all new plumbing, electrical, and HVAC. Insulate with spray foam. Install custom windows. Every phase depended on the one before it.
Project Sequence
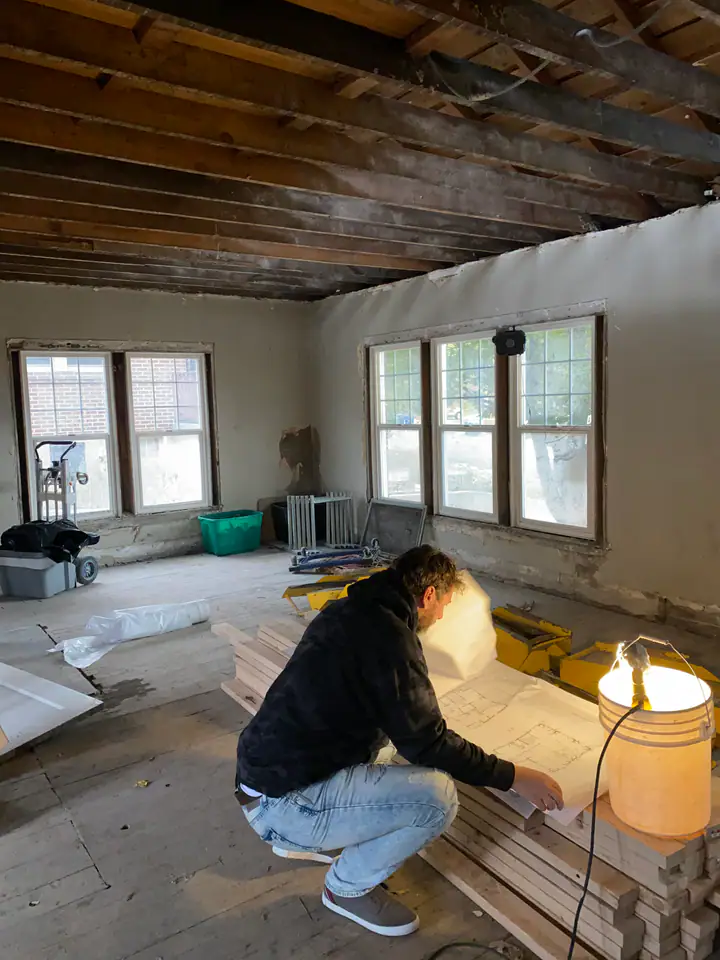
Nate reviewing structural plans on-site — every load path mapped before excavation begins
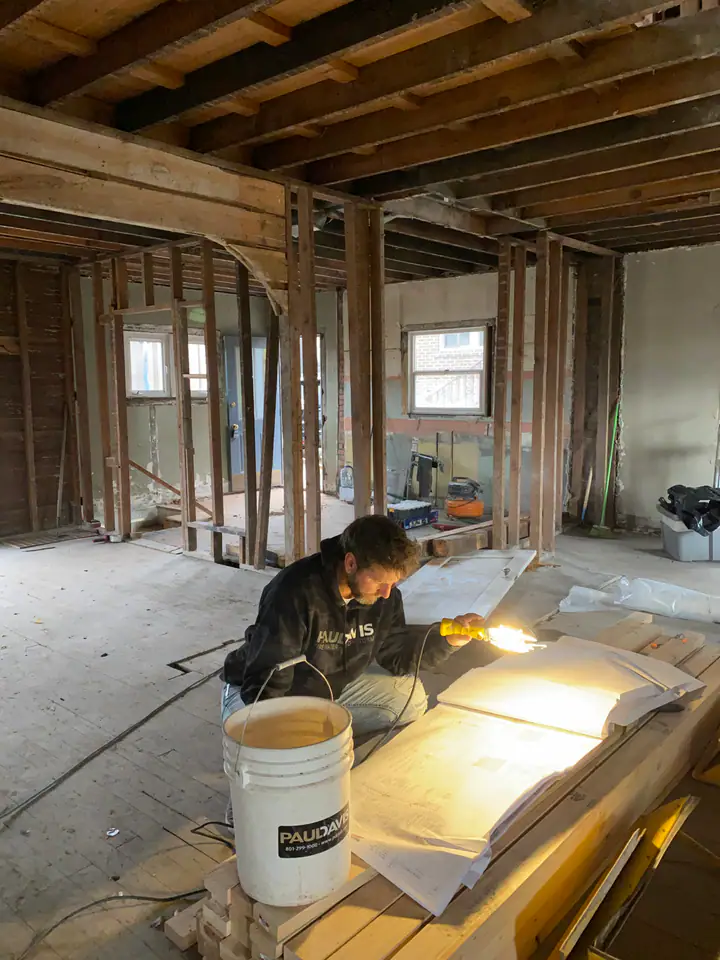
Cross-referencing field conditions against engineered plans — every detail verified before proceeding
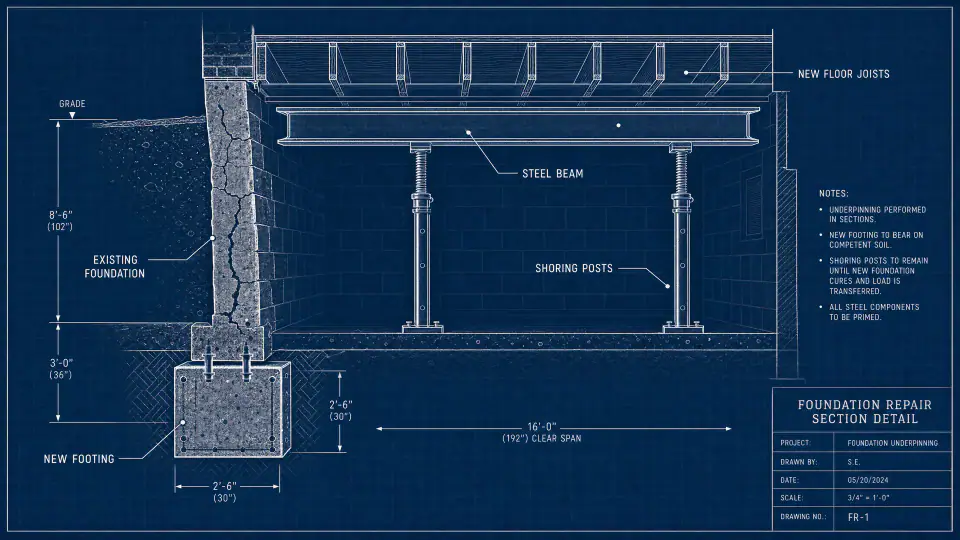
Foundation repair section detail — the engineering that guides every decision below grade
Temporary Support Systems
Holding up a house while you rebuild its bones.
Before you can fix a foundation, you have to take the load off it. That means installing a temporary support system — adjustable steel shoring posts — that transfers the weight of the entire structure to stable bearing points while the permanent supports are removed and replaced.
This isn’t guesswork. Every shoring post is placed according to engineering calculations. The jacks are adjusted with laser-level precision. And they stay in place for weeks — sometimes months — while the permanent structure comes together beneath them. One miscalculation, one post on unstable soil, and you’re dealing with catastrophic failure.
Shoring is the safety net. It’s what keeps the house standing while you rebuild everything that was holding it up. There’s no margin for error.
Steel shoring jacks transferring load from floor joists to temporary bearing points — the house stays standing while its foundation is rebuilt
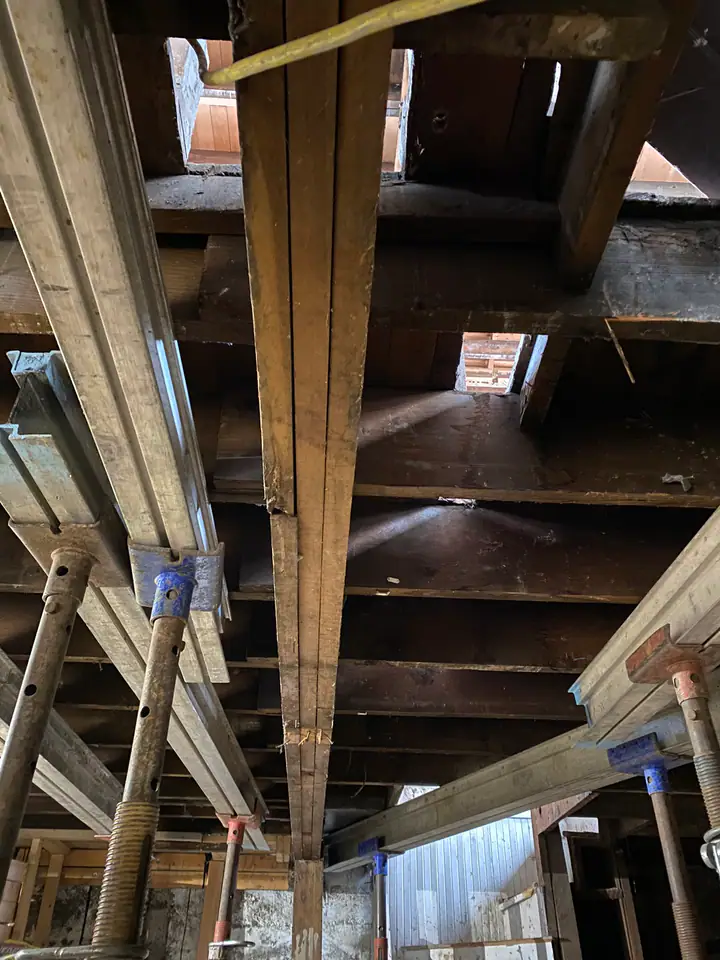
Looking up through the joist system — temporary supports everywhere, gaps in the subfloor showing how compromised the original structure was
Video: Rebar grid assembled for new footing pour — complex reinforcement cage built around existing utilities in a confined basement space
Below Grade
Digging beneath a house that’s still standing.
Foundation underpinning is not excavation — it’s controlled removal. You cut the slab in sections. You dig in a specific sequence so that no more than one footing is exposed at a time. You shore as you go. You monitor for movement constantly.
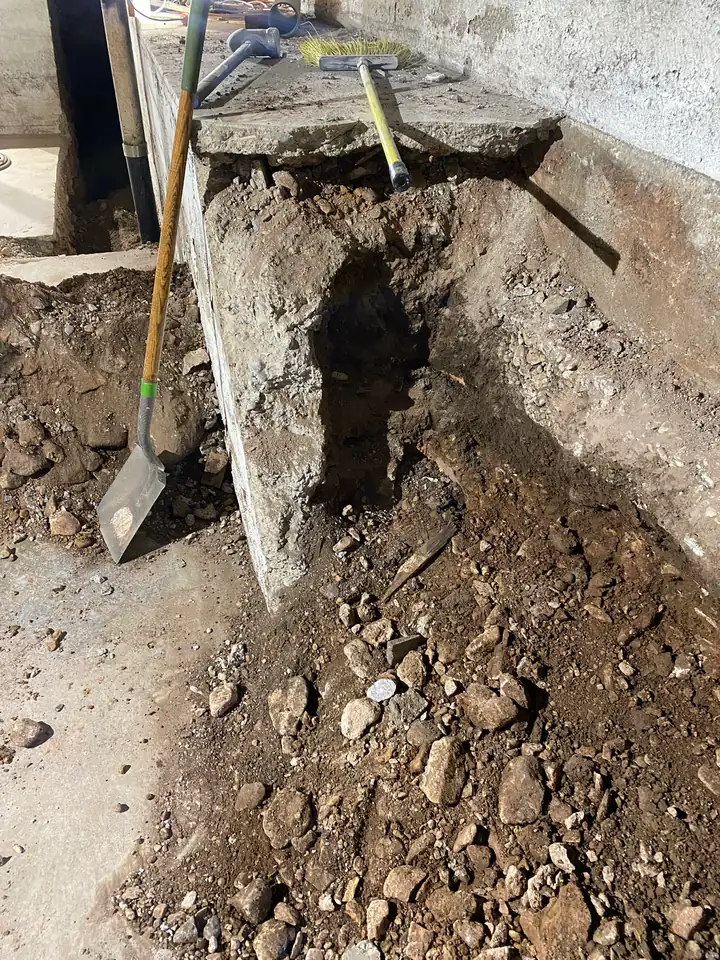
The existing concrete was cut with precision — square pits excavated around each column and footing, exposing the soil beneath to allow for deeper concrete pours. Along the perimeter, trenches were hand-dug to expose the full depth of the foundation wall, revealing both the condition of the concrete and the moisture paths that needed to be addressed.
Every bucket of dirt came out by hand. There’s no machine access in a basement with 6-foot ceilings and a single egress point. This is manual labor guided by engineering — the hardest kind of construction work there is.
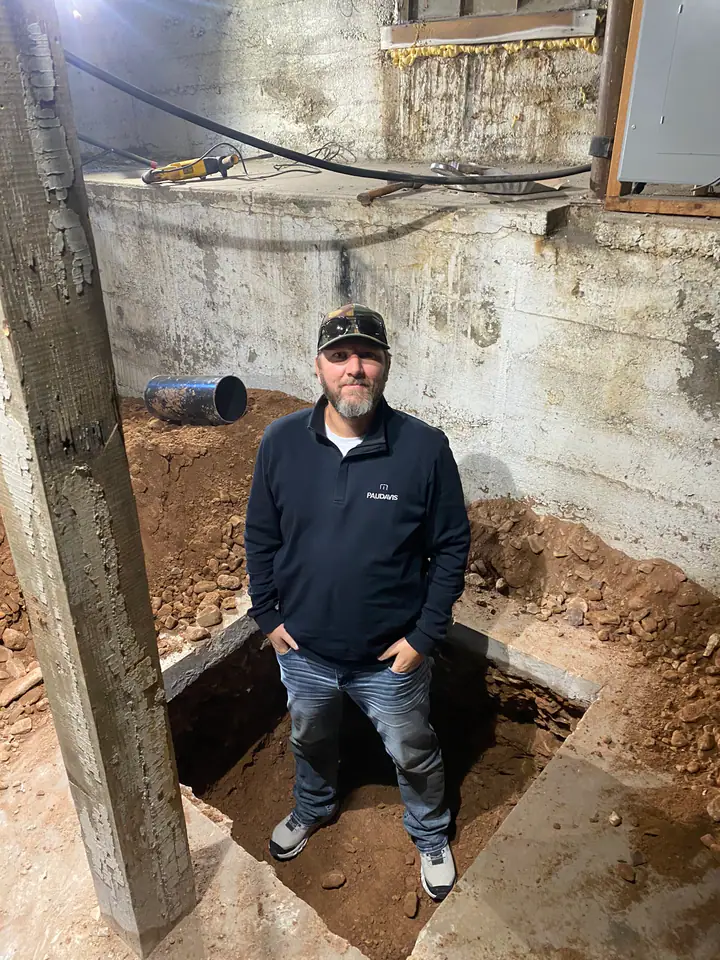
Scale reference: standing in the underpinning excavation — 3+ feet below the original slab
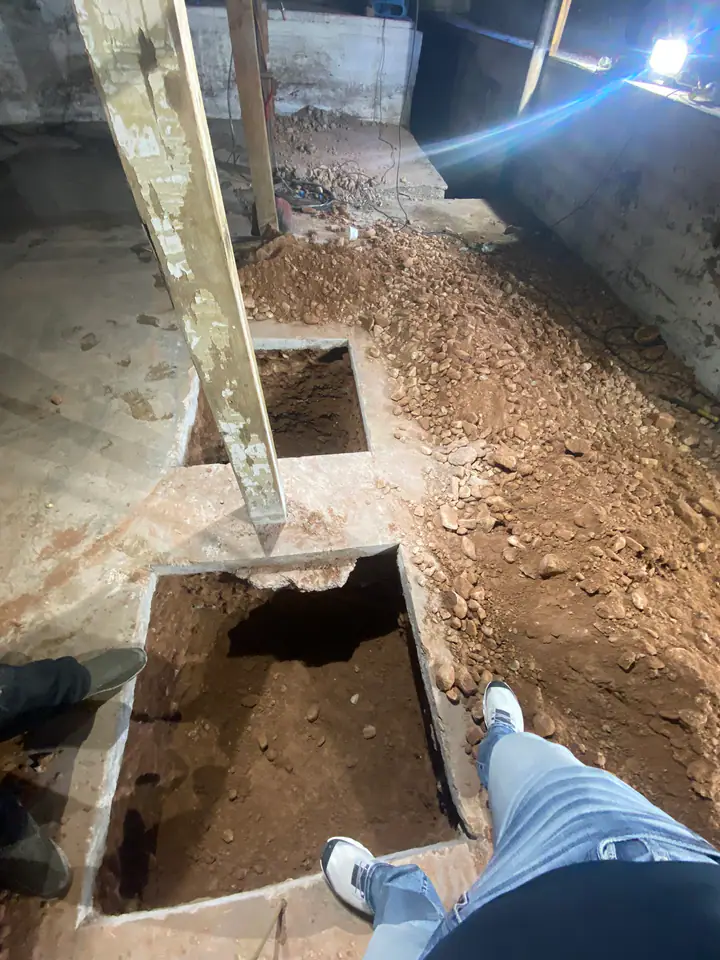
Systematic slab cuts around existing columns
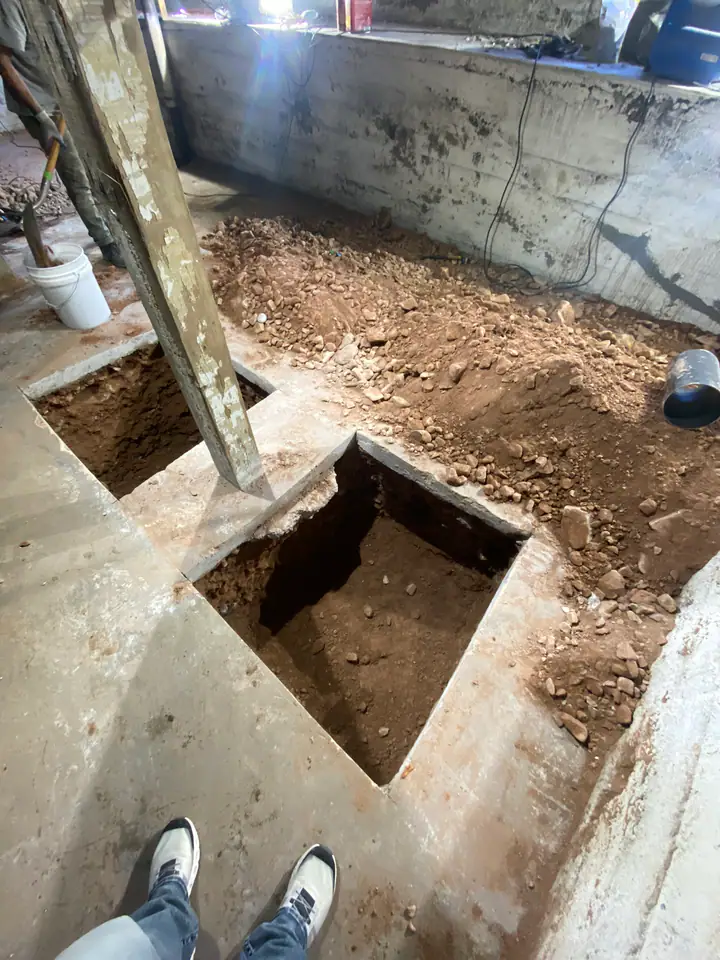
Precision cuts — each section excavated in sequence
Hand-excavation beneath the existing footing
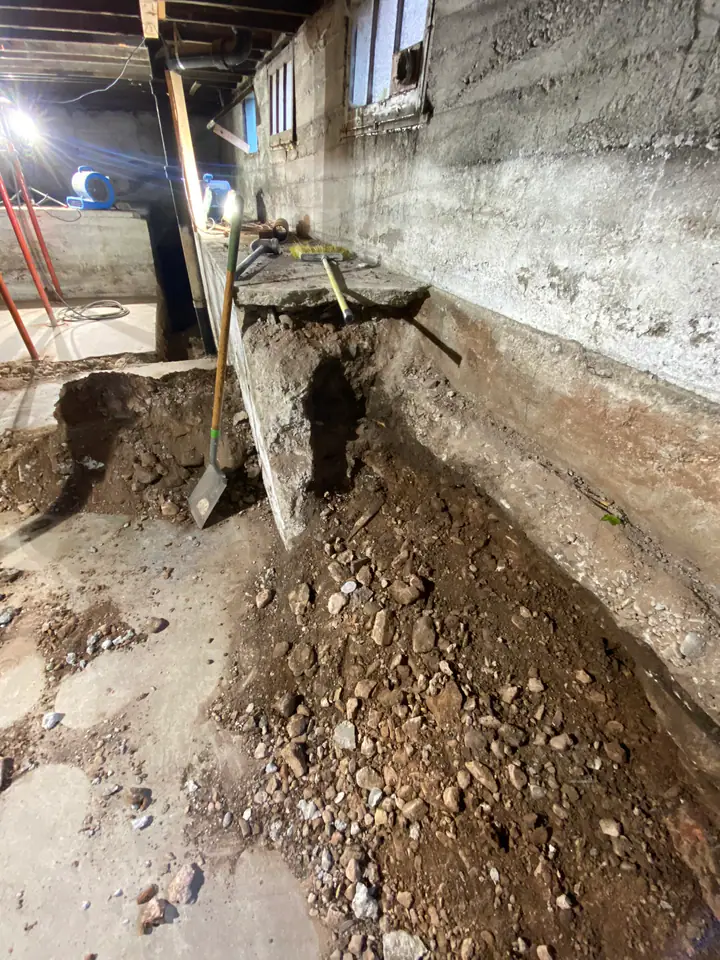
Full perimeter trench — air movers controlling moisture
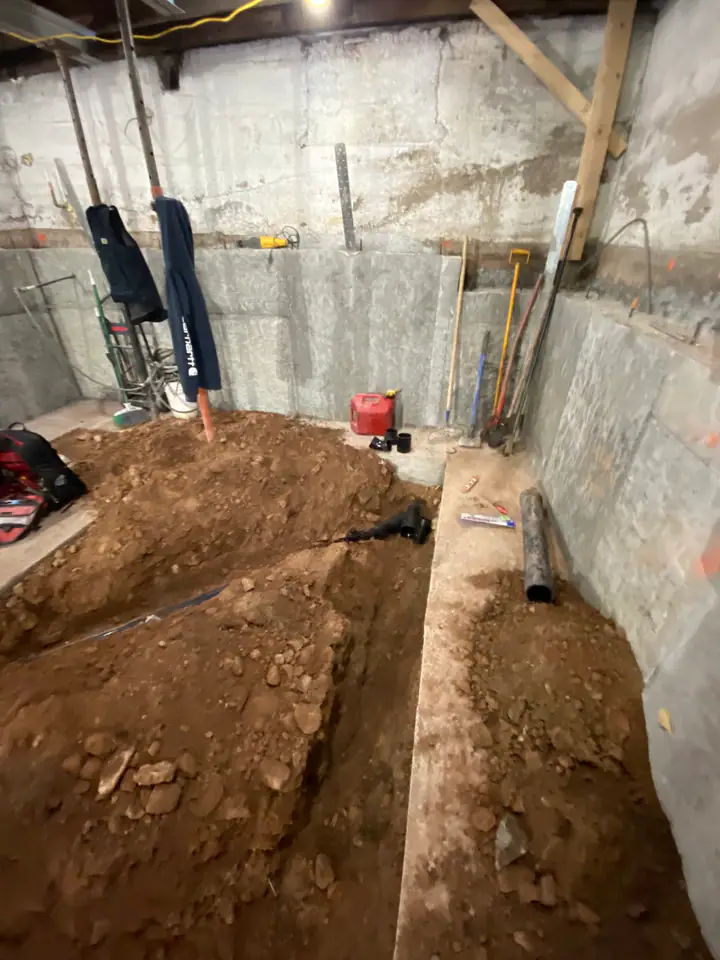
Plumbing rough-in coordinated with footing excavation
Video: Foundation underpinning in progress — excavation, rebar installation, and shoring visible throughout the basement
Permanent Structure
Steel where wood used to be. Concrete where dirt used to be.
The original support system — wood posts on undersized concrete pads — was never designed for the loads a modern renovation demands, let alone a second-story addition. The solution: engineered steel beams spanning the full basement, supported by properly sized columns on new deep footings.
Installing a steel beam in an existing basement isn’t like framing a new house. The beam has to be threaded into position in a confined space, leveled precisely, and connected to columns that sit on footings you just poured days earlier. The sequencing is everything — you can’t load the beam until the concrete has cured, which means temporary shoring stays in place for days while the permanent structure comes together beneath it.
We used laser levels to map the floor sag, then brought in hydraulic jacks to lift and level the floor before installing the permanent beams. You get one shot at this.
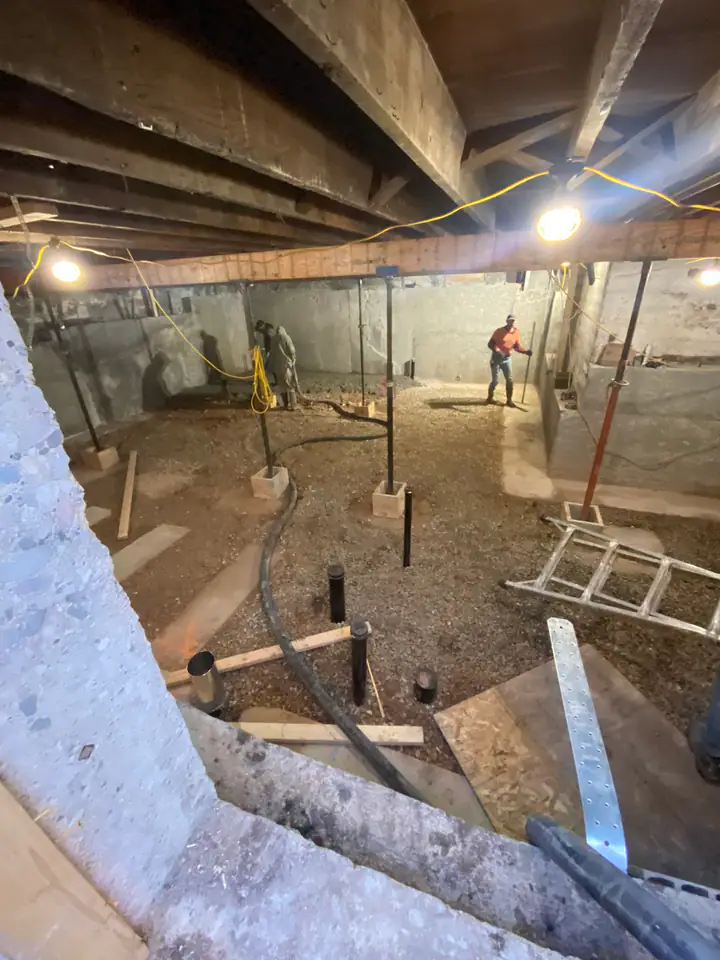
Once the steel was in and the new footings had cured, the concrete crew came in to pour a new slab — level, properly reinforced, and sitting on compacted gravel with a vapor barrier beneath. The basement went from a dirt-floor crawlspace to a structurally sound foundation capable of supporting two stories above.
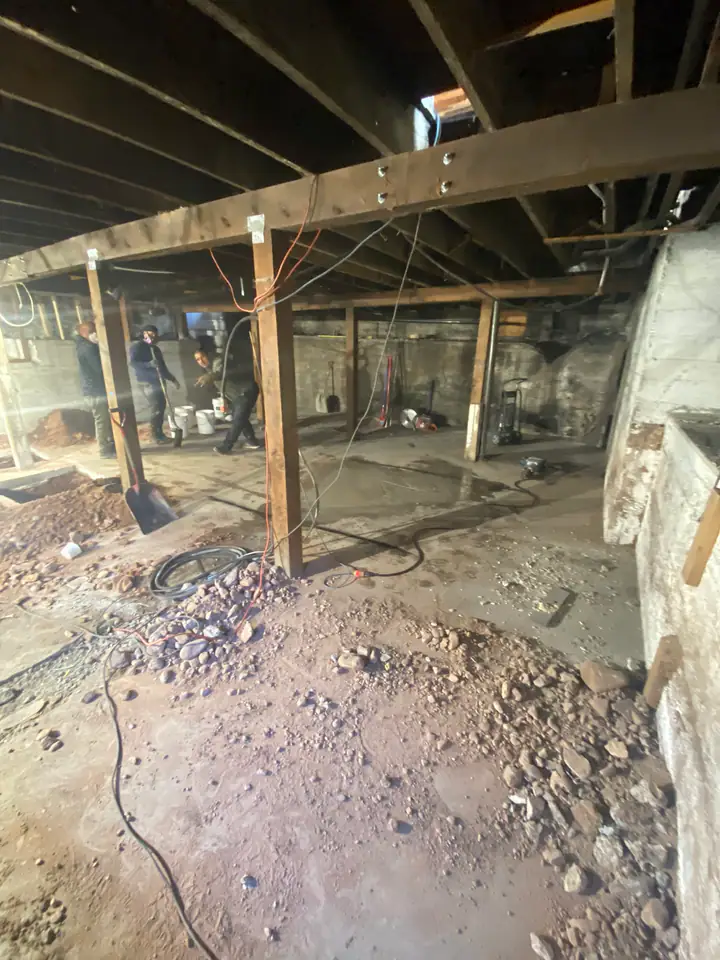
New steel I-beam spanning the basement — replacing the original undersized wood support system
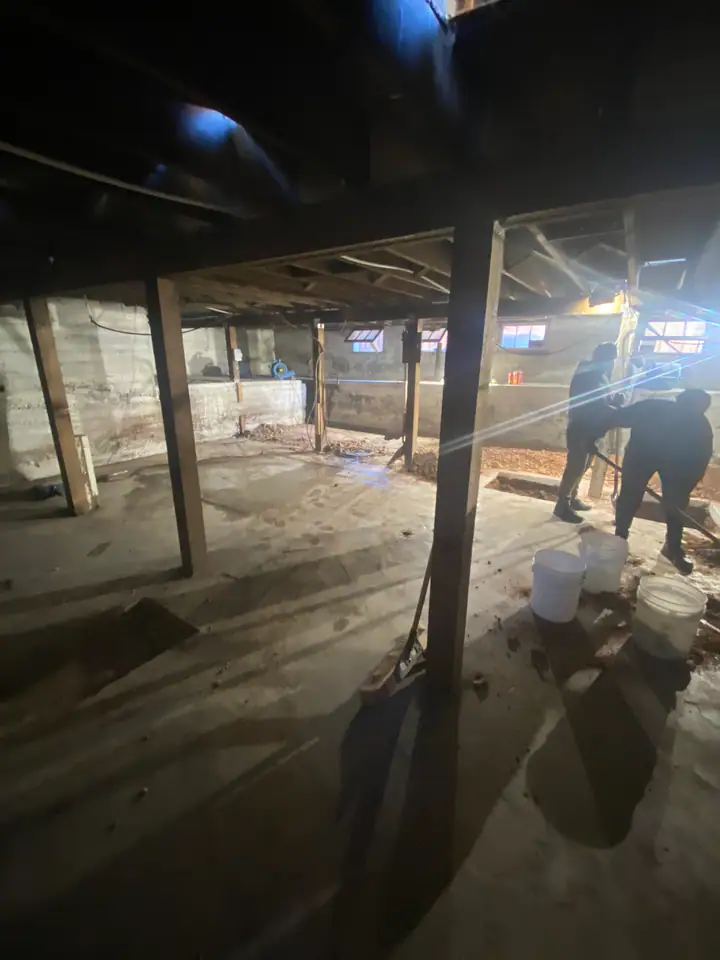
Featured Video — Narrated Walkthrough
Narrated walkthrough: the contractor walks through the project explaining new beams, plumbing rough-in, footing preparation, and the technique used to lift and level the sagging floor
In this walkthrough, you’ll see the new lumber and beams staged outside, the rough plumbing and underground work nearly ready for inspection, the temporary shoring system holding everything up, and the specific technique used to address a significant floor sag — laser levels to map the deflection, then hydraulic jacks to lift it back to level before permanent beams go in.
Video: New concrete slab being poured — pump truck delivering concrete while crew screeds and finishes the surface to level
Planning a project like this one?
12
Project Phases
Foundation to Finish
30+
Shoring Posts
Temporary Support
2
Stories Added
On New Foundation
9
Videos
Full Documentation
40+
Weeks
Start to Dry-in
Building Up
Now you can build on it.
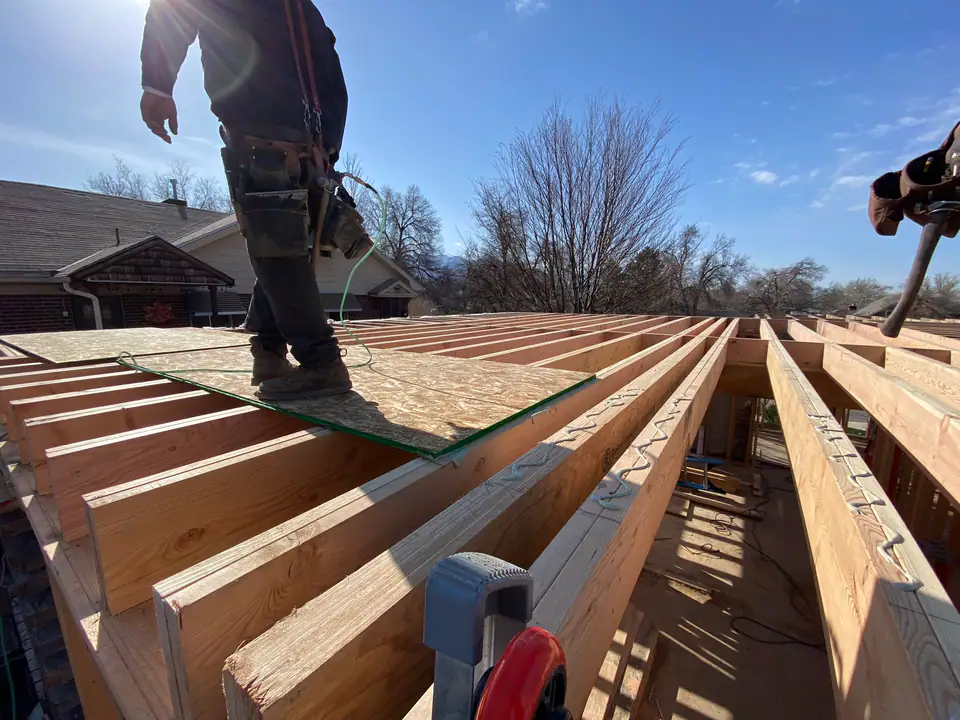
With the foundation solid, the steel in place, and the new slab cured, the project transitioned from below-grade structural work to above-grade framing. New engineered floor joists went in — TJIs designed for the spans and loads that the second-story addition would demand.
This is the moment where the project starts to look like construction instead of archaeology. But the precision doesn’t change. Every joist is set to exact spacing. Every connection is engineered. The floor system has to be dead-level because everything above it — walls, windows, roof — depends on this plane being right.
The foundation work is invisible when it’s done right. But every wall, every window, every roof line above depends on what we did below.
New engineered floor joists going in — the transition from structural repair to new construction
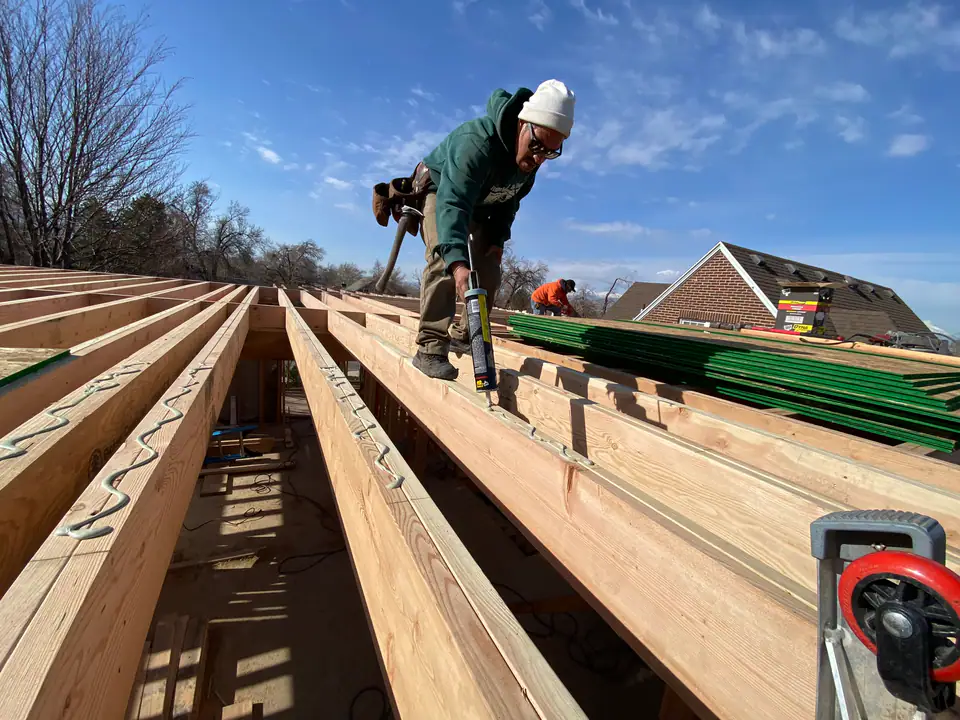
Sealing every joist connection — air-tight construction starts at the floor system
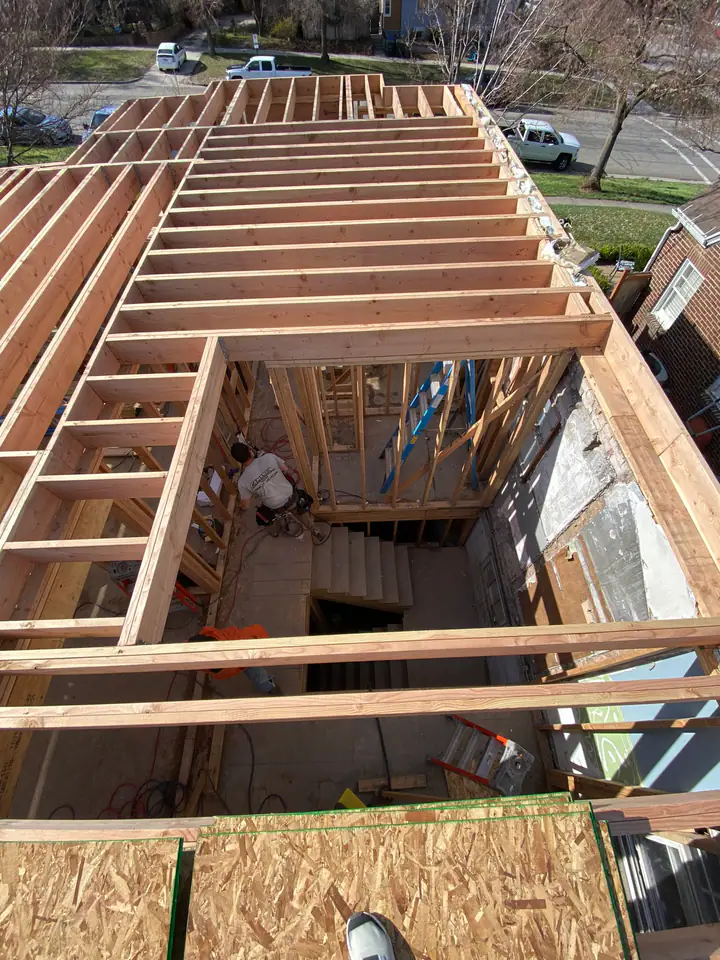
Looking down into the structure — new framing integrating with original brick walls
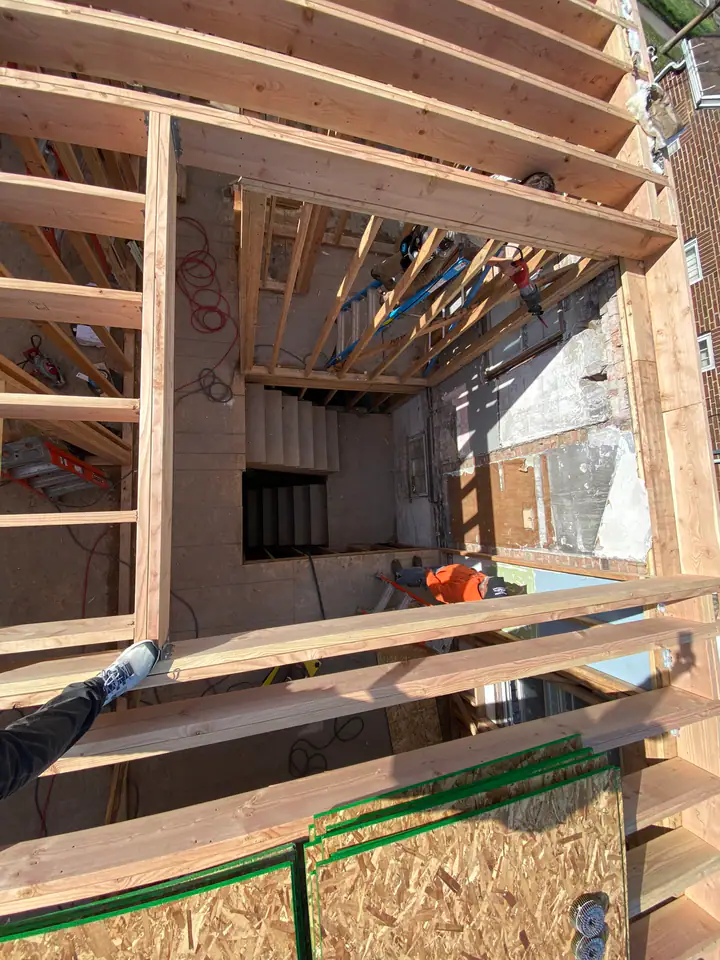
Old meets new: original concrete block and brick integrating with new engineered framing
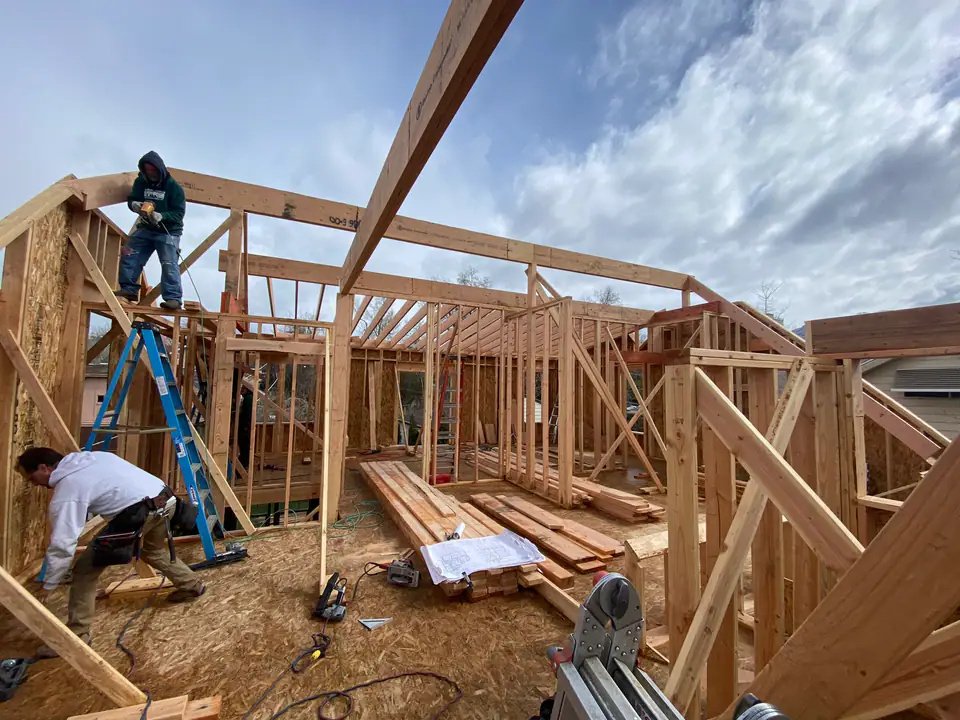
Second-story walls going up — the full scope of the addition becomes visible
Video: Framing the addition — interior wall framing, arched opening construction, and roof deck insulation application
Dried In
A new roof on a new foundation.
The roof framing phase is where the full transformation becomes undeniable. What started as a single-story brick house with a failing foundation is now a two-story structure with new gable ends, arched window openings, and a roof system designed for Utah’s snow loads.
The exterior tells the story of integration: original brick on the first floor, new OSB sheathing and ZIP System panels on the addition above. The arched entry tower connects old and new with architectural intention — this isn’t a box bolted onto an existing house. It’s a cohesive design that respects the original character while dramatically expanding the living space.
Inside, the new upper level features vaulted ceilings, large window openings framed for views, and the kind of volume that only exists because the foundation below was rebuilt to handle it. Every square foot of this new space is supported by the structural work that happened months earlier, underground, in the dark.
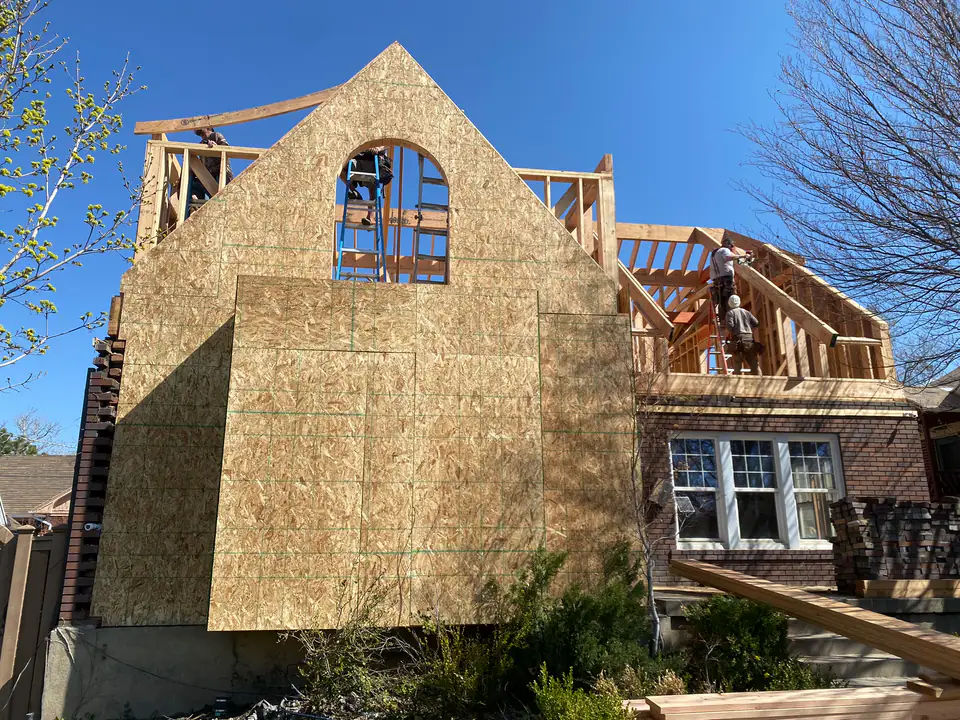
The new gable end with arched window — the scale of the addition is dramatic against the original brick below
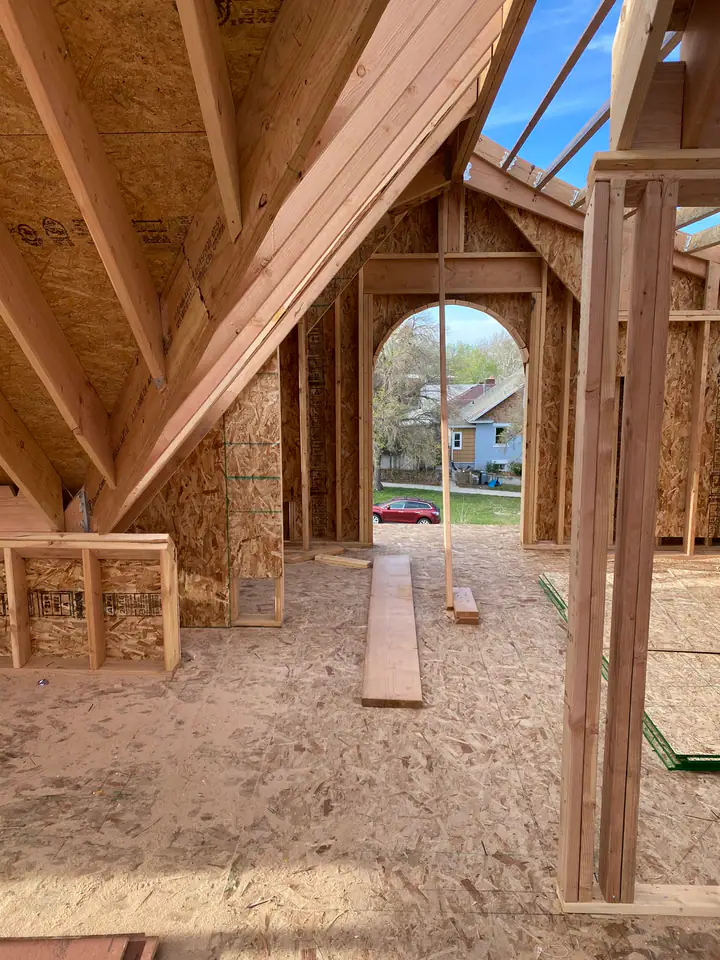
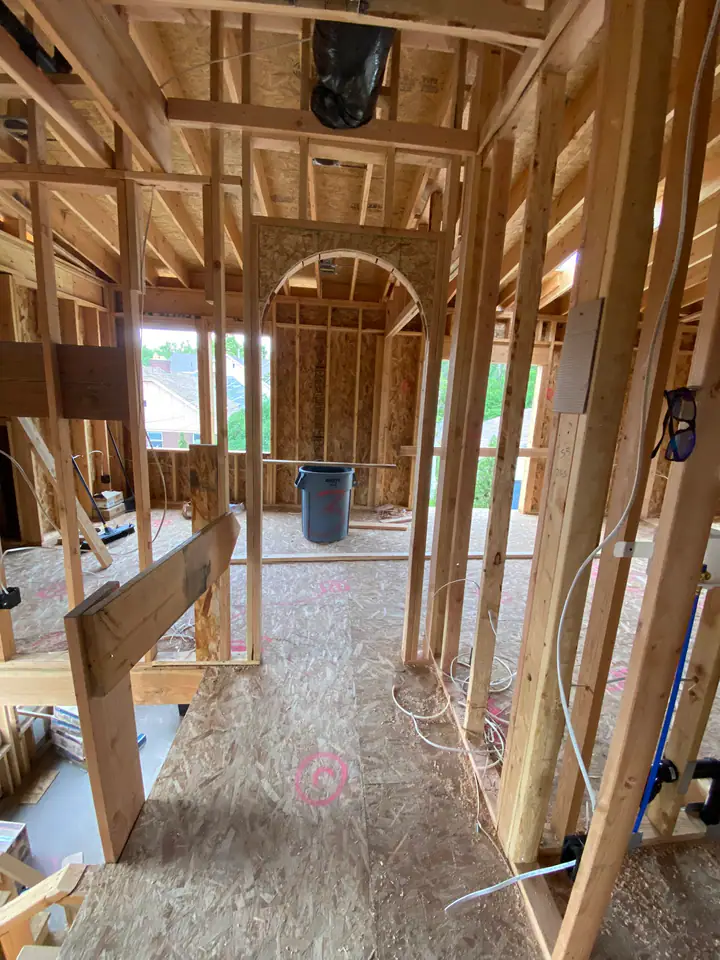
The arched window from inside — craftsmanship in the framing details
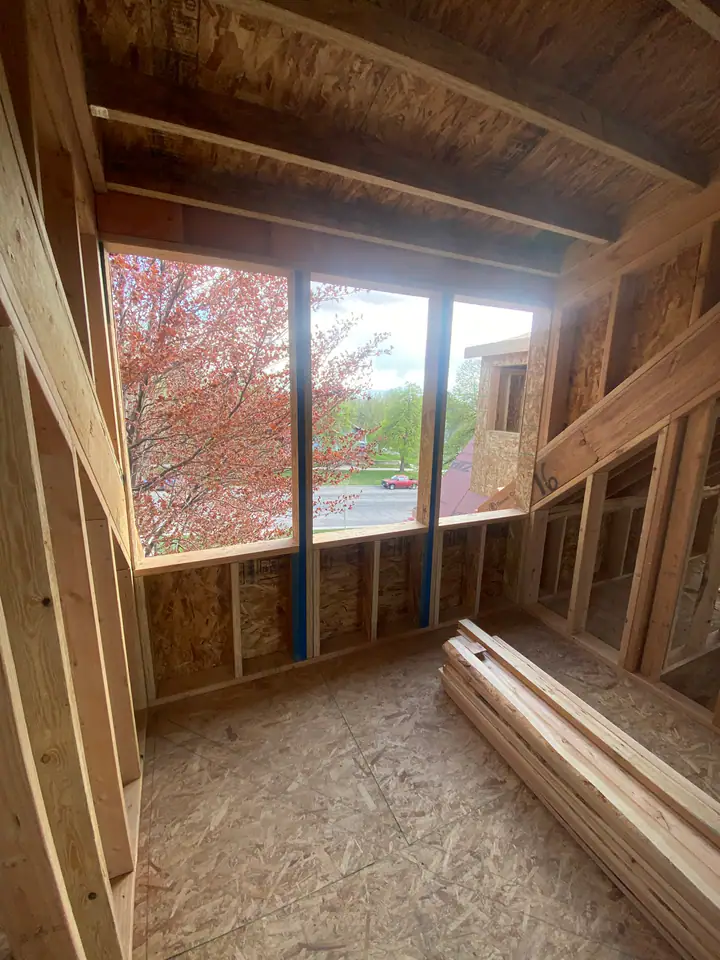
New living space taking shape — vaulted ceiling, large windows, views of the neighborhood
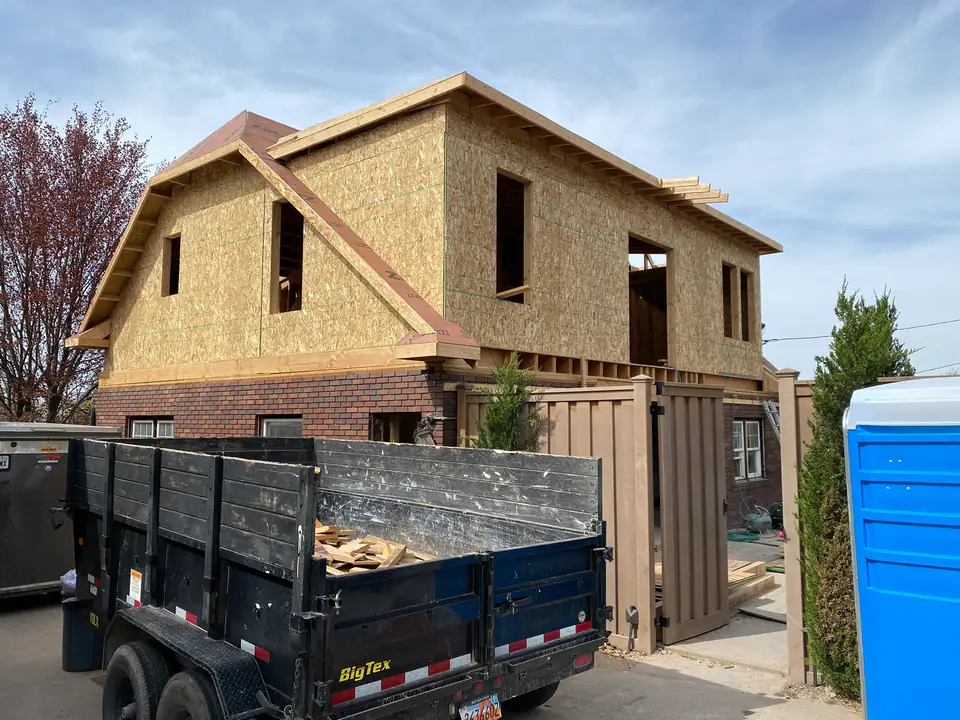
Full exterior — the complete transformation from single-story to two-story
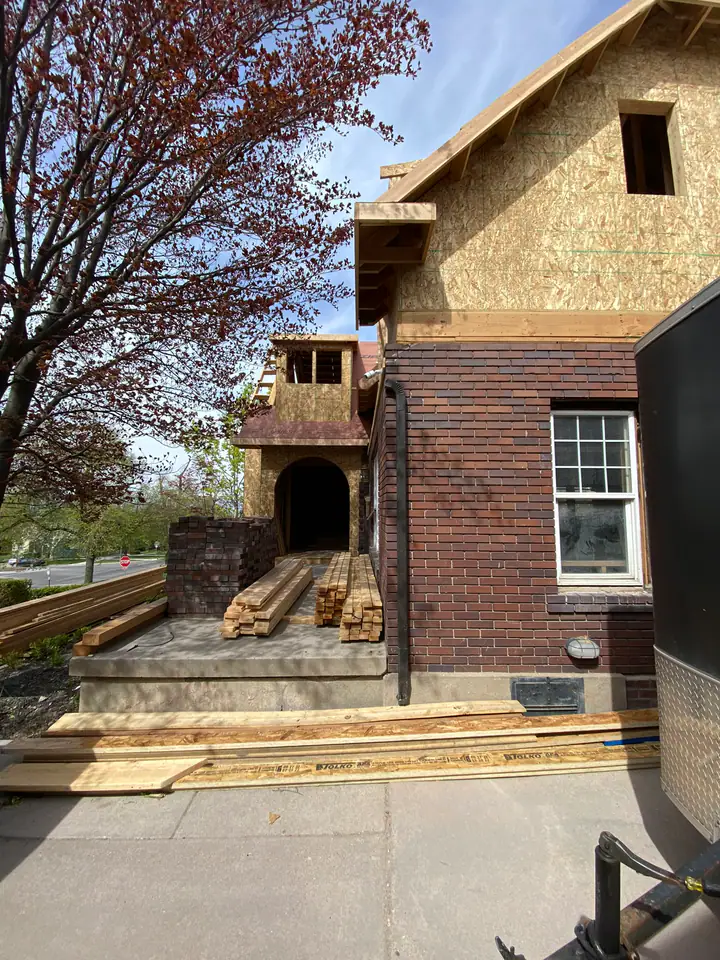
The new entry tower — connecting old brick with new construction
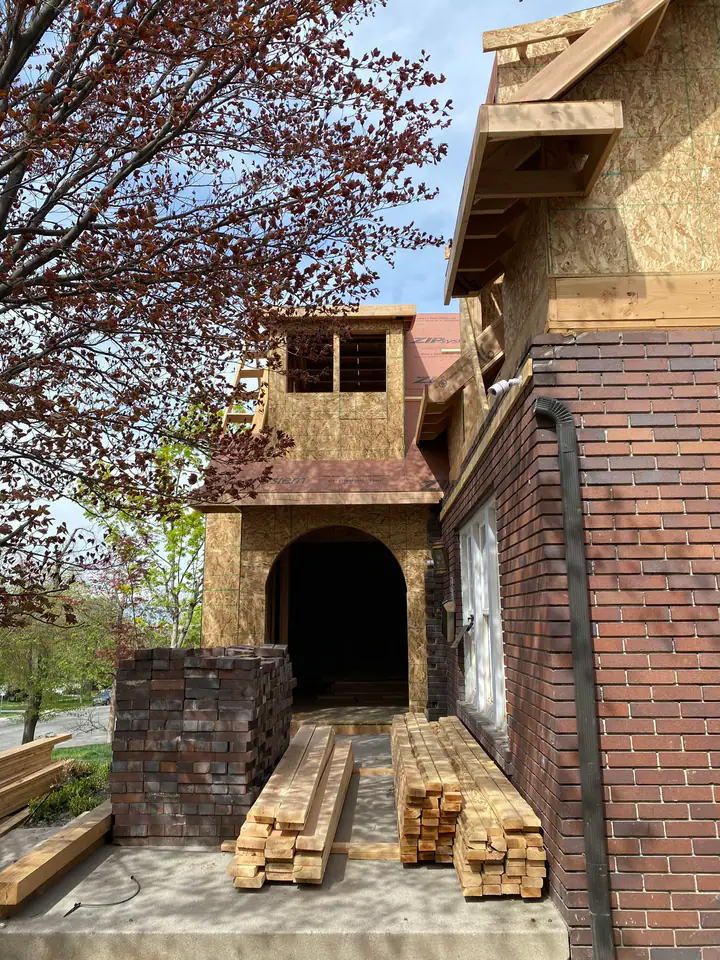
ZIP System sheathing and brick stacks — matching the original character
Video: Roof framing in progress — cutting lumber to size for the new roof structure, crew working at height
Where Old Meets New
The hardest connections are the ones nobody sees.
Connecting new framing to an existing brick structure isn’t a matter of nailing boards together. Every connection point requires engineered hardware — metal joist hangers, LVL beams, and Simpson ties that transfer load from new wood to old masonry without compromising either material.
The original brick walls were never plumb. The old concrete wasn’t level. The existing framing had settled and shifted over decades. Every new piece of lumber had to be custom-fit to an imperfect existing condition — shimmed, scribed, and connected with hardware rated for the actual loads being transferred.
New construction is easy. Renovation is hard. Structural renovation on a house that’s out of level, out of plumb, and out of square? That’s where experience earns its keep.
The arched front entry door — a signature design element — required custom framing that integrated with both the original brick below and the new addition above. It’s a detail that looks effortless in the finished product but required careful geometry and structural coordination to execute.
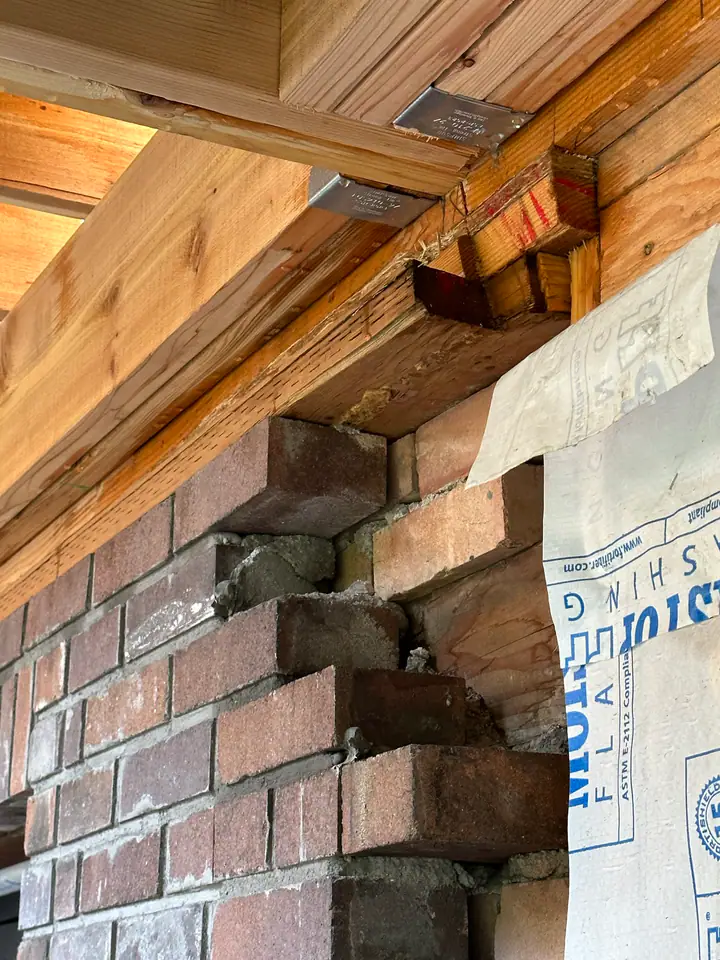
New LVL beam meeting old brick — engineered metal connectors transferring load between materials
Video: Framing the arched entry — structural integration of new construction with existing brick, showing the precision required to connect old and new
Systems & Infrastructure
The guts of a house that will perform for decades.
With the structure dried in, the mechanical, electrical, and plumbing trades moved in to rough-in all new systems. This isn’t just running pipes and wires — it’s designing the infrastructure of a home that needs to perform at a high level for the next 50+ years.
PEX plumbing (red for hot, blue for cold) was run throughout the new framing with home-run manifold connections — meaning every fixture gets its own dedicated line back to the manifold. No shared lines, no pressure drops, no compromises. ABS drain lines were routed with proper slope and venting. HVAC ductwork was sized for the new square footage and insulated for efficiency.
In the basement, the plumbing rough-in had to coordinate with the new concrete slab — drain lines cast into the concrete, supply lines routed through the framing above. Every pipe location was spray-painted on the slab before the pour, then verified against the plans before concrete covered it forever.
You get one chance to get the underground plumbing right. Once the concrete goes over it, there’s no going back without a jackhammer.
PEX plumbing rough-in — red (hot) and blue (cold) supply lines with ABS drain pipe, all routed through new framing
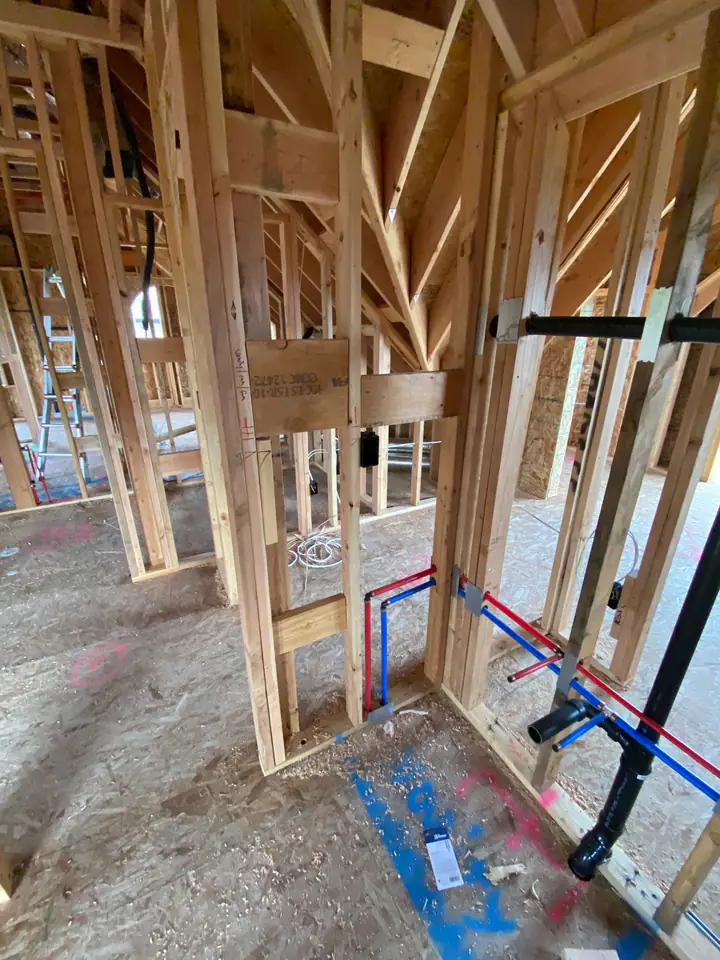
The complete picture: plumbing, electrical, and HVAC all roughed in before walls close
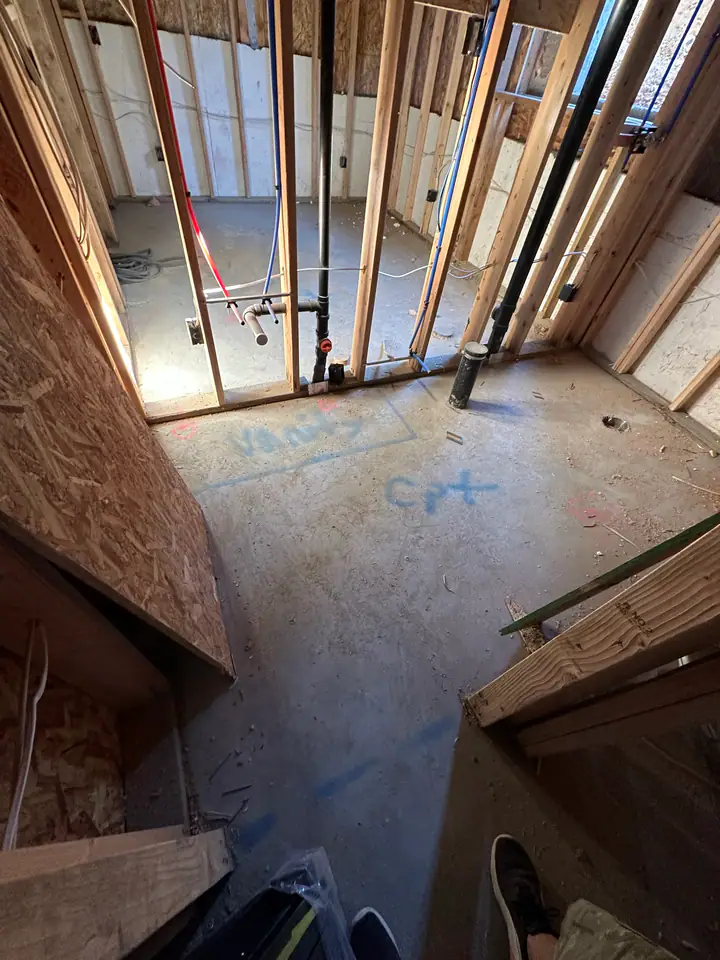
Basement plumbing from above — spray paint layout marks coordinating with concrete pour
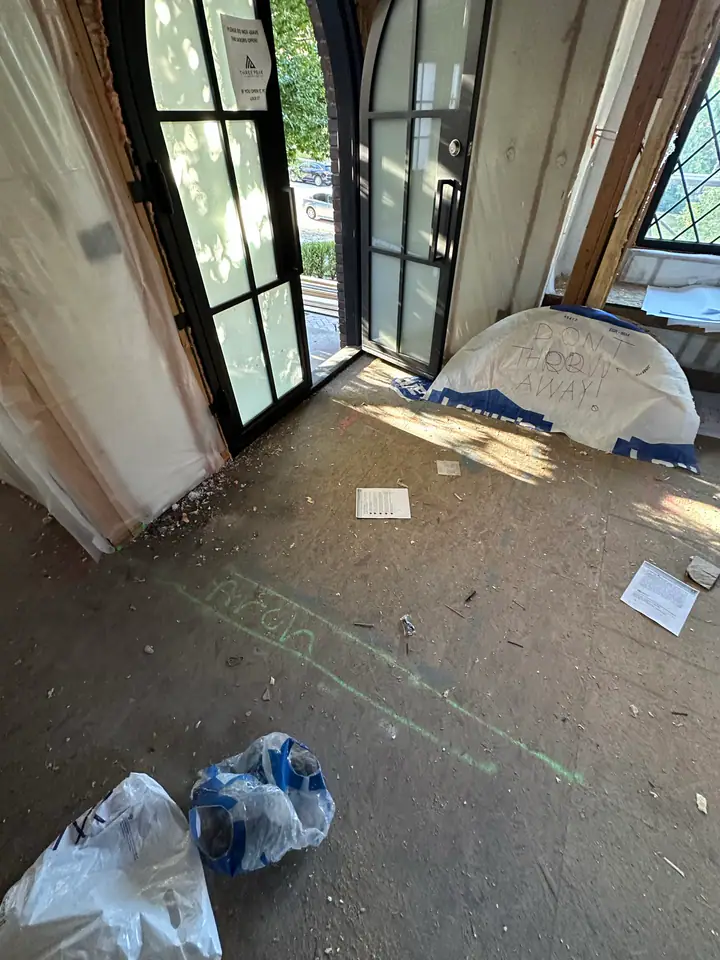
HVAC ductwork sized for the expanded floor plan
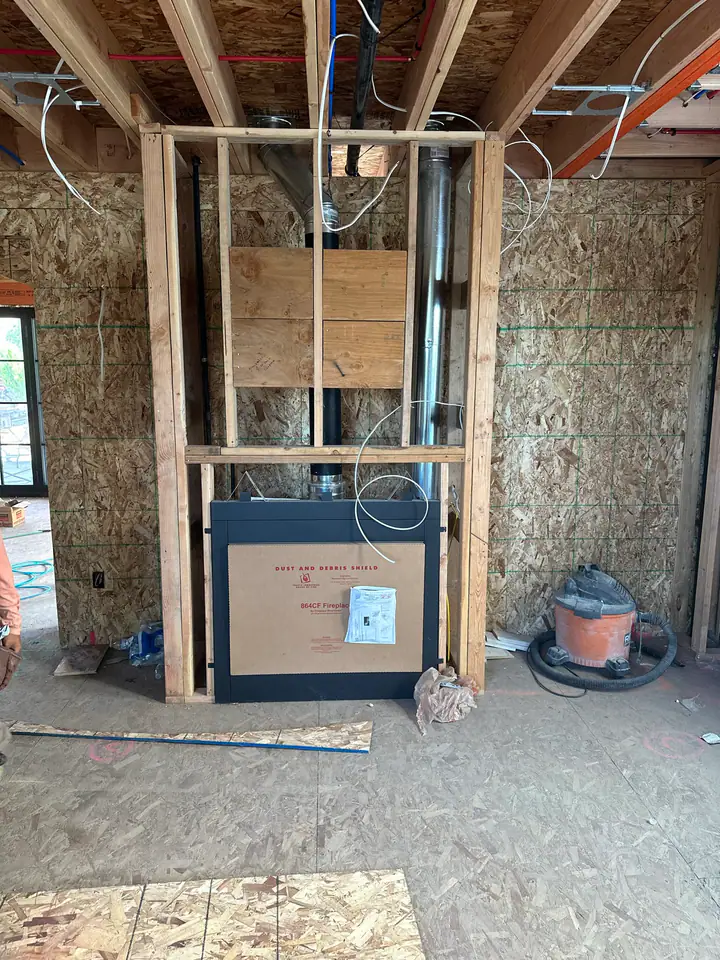
Gas fireplace installation — proper clearances, double-wall chimney, the living room taking shape
Featured Video — MEP Rough-in Walkthrough
Complete walkthrough of the MEP rough-in phase — PEX plumbing, electrical wiring through studs, HVAC ductwork, and the coordination required between trades in a complex renovation
This walkthrough shows the full scope of systems installation: PEX supply lines running to every fixture, ABS drain and vent pipes, electrical wiring through drilled studs, HVAC ductwork in ceiling cavities, and the coordination required when three trades are working in the same walls simultaneously.
Precision in an Imperfect Structure
Leveling windows in a house that isn’t level.
Here’s a problem most homeowners never think about: when you install new windows in an old house, the rough openings aren’t square. The headers aren’t level. The jack studs aren’t plumb. Decades of settling have shifted everything just enough that a window installed “flush to the framing” would be visibly crooked.
The solution is precision shimming — leveling each window unit independently within its rough opening, regardless of what the surrounding framing is doing. It’s painstaking work that requires a level on every unit, shims on multiple sides, and the patience to get it right before the foam and trim lock everything in place.
The annotated photos tell the story: “Shims on top to level.” “Level windows.” Every unit individually adjusted because the old structure doesn’t give you anything for free.
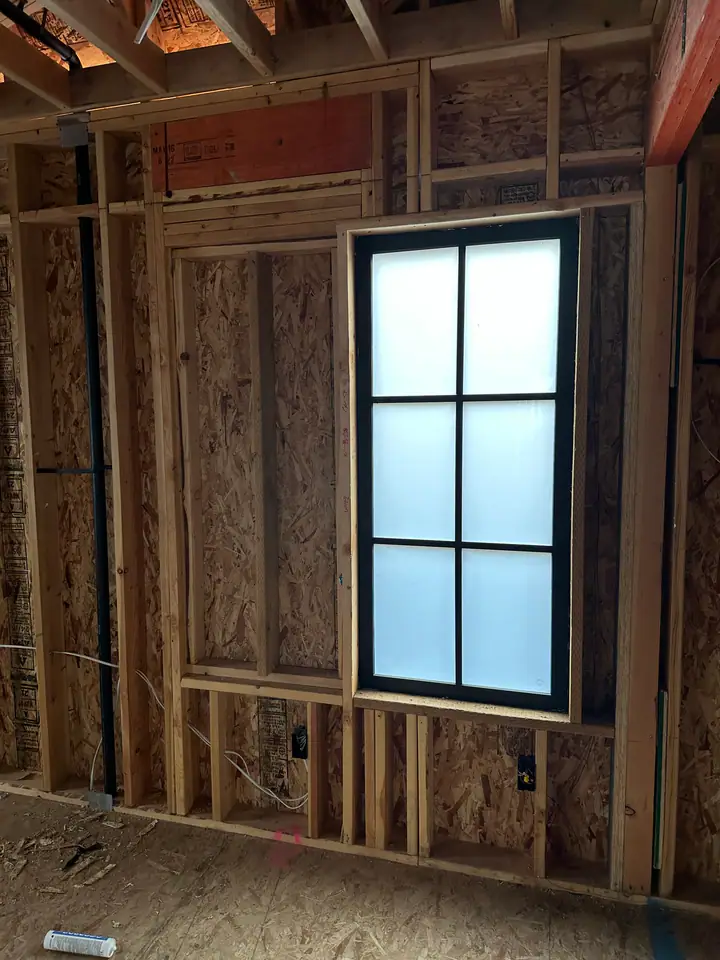
The diamond-pane leaded glass windows are a design statement — they reference the home’s original character while being modern, energy-efficient units. Installing them in a Boise Cascade engineered header (an LVL that doesn’t bow or twist like dimensional lumber) ensures they’ll stay level and operable for decades.
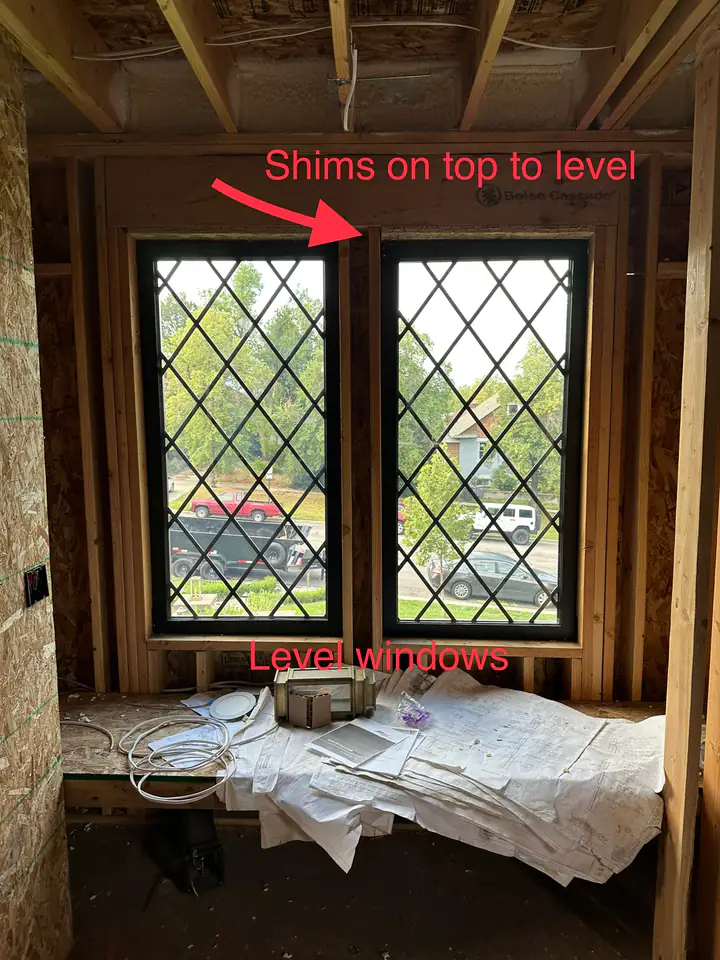
The annotated field photo: red arrows showing where shims were needed to level windows in an out-of-square opening
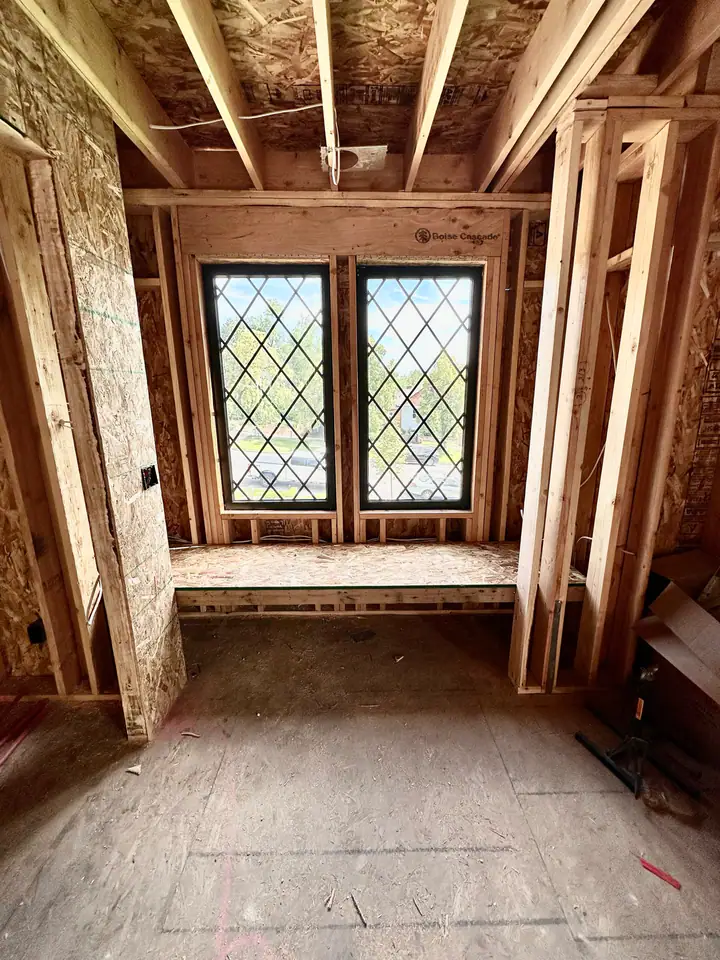
Diamond-pane leaded glass in engineered LVL header
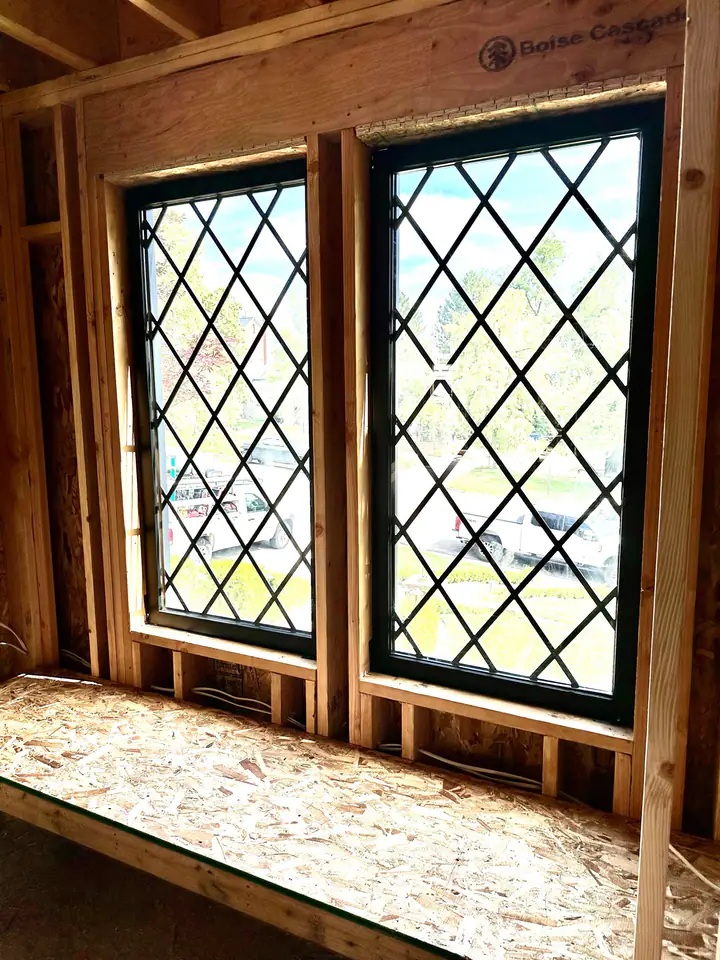
Detail: precision fit in an imperfect opening
Video: Window installation process — shimming, leveling, and securing each unit in rough openings that aren't square
Performance Envelope
Building it tight. Building it right.
A structural rehabilitation isn’t just about making a house stand up — it’s about making it perform. This home went from a drafty, poorly insulated older structure to a high-performance envelope with closed-cell spray foam insulation on every exterior wall and the entire roof assembly.
Closed-cell spray foam does three things simultaneously: it insulates (R-6.5 per inch), it air-seals (eliminating the drafts that make older homes uncomfortable), and it adds structural rigidity to the wall assembly. In a rehabilitation project with irregular framing, old brick, and complex geometry, spray foam conforms to every surface in a way that batt insulation simply can’t.
This house went from “barely insulated” to one of the tightest envelopes in the neighborhood. That’s not just comfort — it’s decades of lower energy bills.
The staircase — a new structural element connecting the original main level to the new second story — was built with solid stringers and OSB treads, designed to carry the traffic loads of a two-story home. It’s another detail that only exists because the foundation below was rebuilt to support it.
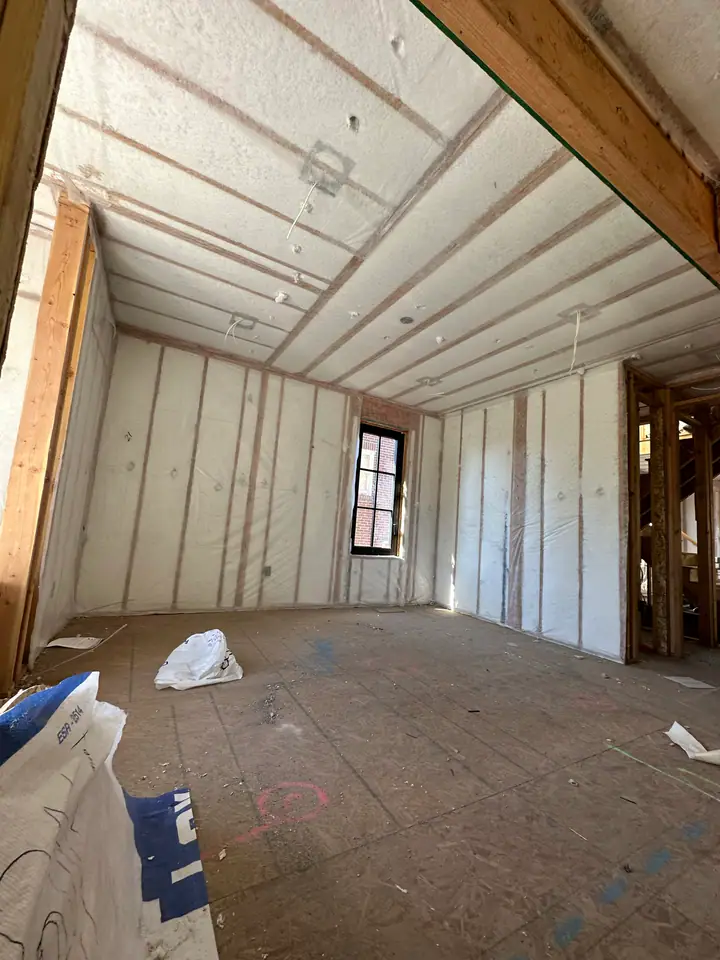
Closed-cell spray foam covering every surface — walls, ceiling, and the complex geometry of the vaulted roof assembly
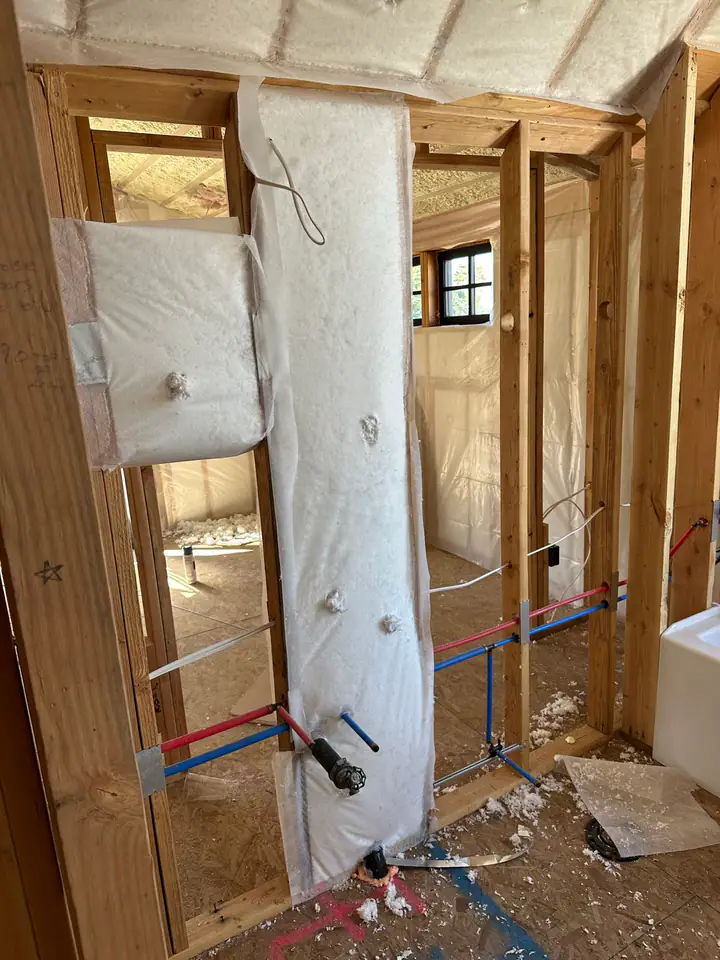
Interior walls insulated around plumbing — vapor barrier in place
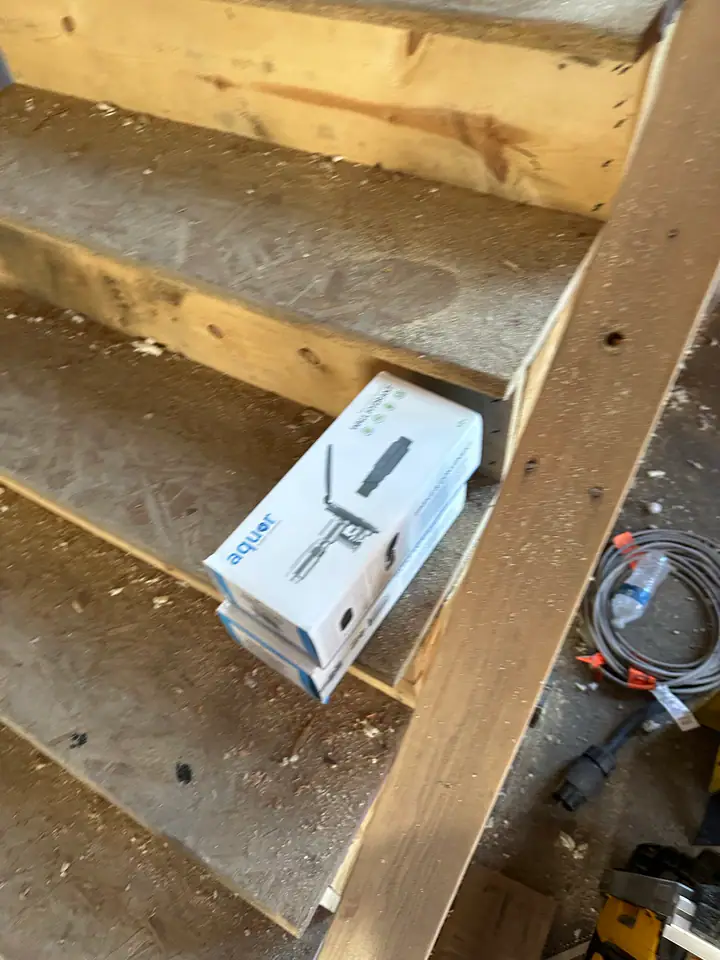
New staircase: solid stringers connecting levels
The Takeaway
Why we show you the ugly stuff.
Most contractors show you the pretty “after” photos. The finished kitchen. The staged living room. The drone shot at sunset. We show you the dirt, the steel, the shoring jacks, the rebar, the spray foam, and the annotated field photos — because that’s where the real work happens.
This project exists because Nate Jensen has spent years doing the kind of work that doesn’t photograph well but determines whether a house stands for another hundred years. Foundation underpinning. Load-path engineering. Temporary shoring beneath a living structure. Steel beam installation in confined spaces. Precision window installation in out-of-square openings. These aren’t skills you pick up on YouTube. They come from years of field experience, failed experiments, and hard-won knowledge about how buildings actually behave.
Anyone can frame a wall. Not everyone can hold up a house while they rebuild the thing that was holding it up. That’s the difference.
If you’re looking at an older home and wondering whether it’s worth saving — whether the foundation can be fixed, whether a second story is possible, whether the structural problems are solvable — the answer is usually yes. But only if you have the right contractor. One who thinks in systems, sequences in phases, and has done this work enough times to know what surprises look like before they become emergencies.
This project went from a house that most contractors would have walked away from to a fully rebuilt, high-performance, two-story home with a new foundation, new steel, new concrete, new framing, new roof, new systems, spray foam insulation, and custom windows. Every phase documented. Every decision intentional. That’s what Three Peak does differently.
Foundation Underpinning
Excavating beneath existing footings to deepen or strengthen them — working in controlled sections to maintain structural integrity throughout.
Steel Beam Installation
Threading engineered steel beams into confined spaces, leveling precisely, and connecting to new columns on properly sized footings.
Temporary Shoring
Adjustable steel post systems that transfer structural loads to stable bearing points while permanent supports are rebuilt.
Load-Path Engineering
Tracing how gravity and lateral forces move through a structure — and ensuring every connection in that path is properly sized and supported.
Structural Integration
Connecting new framing to existing brick and masonry with engineered hardware — making old and new work together as one system.
MEP Coordination
Routing plumbing, electrical, and HVAC through complex framing while coordinating between trades and maintaining structural integrity.
Spray Foam Insulation
Closed-cell foam that insulates, air-seals, and adds structural rigidity — conforming to irregular geometry that batt insulation can't address.
Precision Window Installation
Leveling and shimming each window unit independently in out-of-square openings — ensuring operation and seal regardless of structural imperfection.
Second-Story Additions
Adding vertical load to an existing structure — but only after the foundation below has been verified or upgraded to handle it.
Common Questions
Structural work FAQ.
Foundation and structural rehabilitation raises a lot of questions. Here are the ones we hear most often from homeowners considering this type of work.
Foundation underpinning involves excavating beneath existing footings to deepen or strengthen them. It's needed when a home's foundation has settled, cracked, or when a homeowner wants to lower a basement floor to gain ceiling height. In the Park City area, older homes often need underpinning due to original foundations that weren't designed for modern loads or basement finishing.
Structural foundation work in Utah typically ranges from $50,000 to $200,000+ depending on scope, soil conditions, access constraints, and the extent of underpinning or steel reinforcement required. A full structural rehabilitation with second-story addition like this project can exceed $300,000 for the structural scope alone. Three Peak provides honest low/likely/high estimate ranges during preconstruction planning so homeowners understand the full picture before committing.
Yes, but the foundation must be fully remediated first. You cannot add load to a failing structure. The correct sequence is: stabilize with temporary shoring, excavate and underpin the foundation to modern standards, install engineered steel support systems, pour new concrete, and only then begin framing the addition above. This project is a textbook example of that sequence executed correctly.
Common issues include inadequate footings for current building codes, moisture intrusion through aging foundation walls, undersized support posts and beams, settling or cracking foundations, and crawlspaces that were never properly waterproofed. Many older homes also have load-bearing walls that need steel beam replacements to open up floor plans or support additions above.
Yes. Any work involving load paths, footings, or structural support requires engineered plans stamped by a licensed structural engineer. Three Peak coordinates directly with structural engineers during preconstruction to develop solutions that are both code-compliant and buildable — avoiding the common problem of engineered plans that look good on paper but create field complications.
A complete structural rehabilitation — from initial shoring through foundation work, new concrete, framing, and roof — typically takes 6 to 12 months depending on scope and weather. This project involved foundation underpinning, a full second-story addition, new roof framing, complete MEP rough-in, spray foam insulation, and custom window installation — requiring careful sequencing across multiple phases of work.
Temporary shoring consists of adjustable steel posts and beams that hold up the existing structure while permanent supports are removed or replaced. It's the safety system that keeps the house standing during foundation work. Improper shoring is one of the most dangerous mistakes in structural renovation — it requires engineering calculations and constant monitoring.
Yes. Nate Jensen's background in restoration and structural rehabilitation means Three Peak regularly takes on projects that other contractors walk away from. Foundation failures, load-path engineering, steel beam installation, basement lowering, and full structural rebuilds are core competencies — not occasional side projects.
Closed-cell spray foam insulation provides both thermal insulation and structural rigidity. In a rehabilitation project with irregular framing, old brick walls, and complex geometry, spray foam conforms to every surface and seals air leaks that batt insulation can't address. It also adds shear strength to wall assemblies and creates a vapor barrier — critical in older homes with moisture history.
Older homes that have settled or shifted are rarely plumb and level. Installing windows requires shimming each unit individually to achieve level and plumb within the rough opening, even when the framing around it isn't square. This precision work ensures windows operate correctly, seal properly, and look right — despite the imperfect structure they're installed in.
Your Project
Got a structural problem no one else will touch?
Foundation issues. Sagging floors. Load-bearing walls that need to move. Second-story additions on older homes. If it involves structure, we’ve probably done it — and we’ll tell you honestly what it takes.